To safely mark a queen bee, the most critical precautions are to handle her with extreme gentleness, apply a single, small dot of non-toxic paint exclusively to the top of her thorax, and ensure the paint is completely dry before she is returned to the colony. Misplacing paint on her antennae, eyes, or wings, or releasing her while the paint is still wet, can lead to injury, disorientation, and her rejection by the hive.
The core objective of marking a queen is not simply to color her, but to do so with minimal stress to both the queen and the colony. A successful marking makes future hive management more efficient while ensuring the queen's health and acceptance are never compromised.

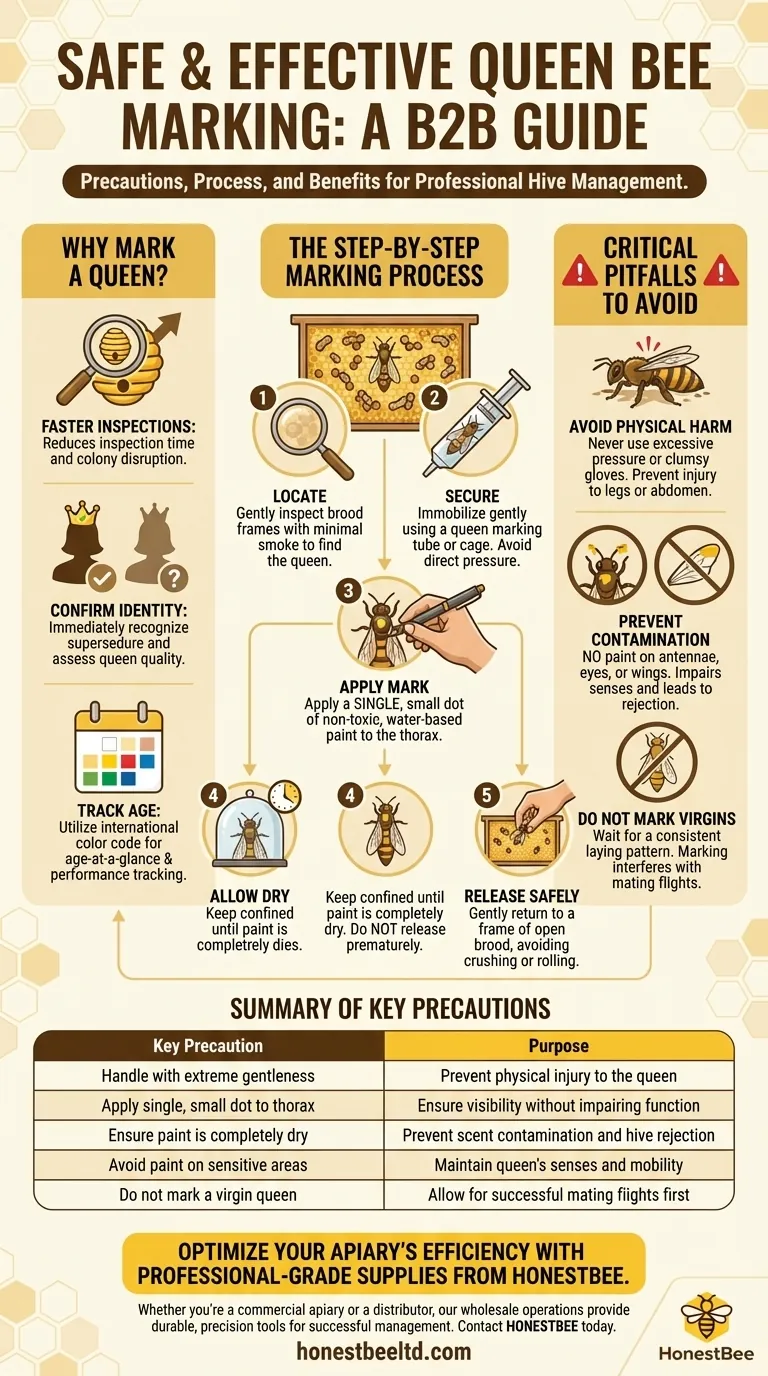
Why Mark a Queen Bee?
Marking a queen is a fundamental practice in modern beekeeping that provides immediate, actionable information. It transforms hive inspections from a search-and-find mission into a quick, targeted assessment.
Faster Hive Inspections
A brightly colored queen is significantly easier to spot on a frame crowded with thousands of bees. This drastically reduces the time spent on inspections, which in turn means less disruption and stress for the entire colony.
Confirming Her Identity
A marked queen provides certainty. If you find an unmarked queen, you know immediately that the colony has superseded (replaced) your original queen. This allows you to assess the new queen's quality and genetics instead of assuming the old one is still present.
Tracking Her Age
Beekeepers use an international color code that assigns a specific color to each year. This system allows you to know your queen's age at a glance. Younger queens are typically more prolific egg-layers and produce more of the pheromones that maintain colony cohesion and reduce the likelihood of swarming.
The Step-by-Step Marking Process
A steady hand and the right tools are essential for a process that should take only a few minutes. Rushing this procedure is the most common cause of mistakes.
Step 1: Locating the Queen
Gently inspect the brood frames, where the queen is most likely to be found laying eggs. Use minimal smoke, as too much can cause the queen to hide or run, making her harder to find and capture.
Step 2: Securing the Queen
Once located, you must immobilize her gently. Many beekeepers use a queen marking tube or cage. These tools allow you to trap the queen against a mesh screen with a soft foam plunger, giving you clear access to her thorax without applying direct pressure.
Alternatively, an experienced beekeeper may pick her up by her wings or thorax, a technique that requires confidence and dexterity.
Step 3: Applying the Mark
Using a non-toxic, water-based queen marking pen, apply a single, small dot of paint to the middle of her thorax (the section between her head and abdomen). This hard, shell-like area is the safest place to apply the mark.
Step 4: Allowing the Paint to Dry
After applying the paint, keep the queen safely confined for a few minutes. This allows the paint to dry completely. Do not release her prematurely, as wet paint can get on other bees or onto her own appendages, and the foreign scent can cause the colony to reject her.
Step 5: Releasing Her Safely
Once the paint is dry, gently release the queen back onto a frame of open brood. Carefully and slowly place the frame back into the hive, ensuring you do not crush or "roll" her between frames.
Understanding the Critical Pitfalls
Avoiding a few key mistakes is paramount to the queen's survival and the colony's stability. These errors are the most common reasons for a marking to fail.
Avoid Harming the Queen Physically
The greatest risk is physical injury. Never apply excessive pressure when caging or holding her. Using large, clumsy leather gloves is not recommended; either use thin, dexterous gloves or bare hands if you are comfortable. A crushed leg or abdomen is a death sentence.
Prevent Paint Contamination
The placement of the paint is non-negotiable. Never allow paint to touch her antennae, eyes, wings, or joints. Paint on these sensitive areas can impair her senses and movement, leading the worker bees to identify her as defective and kill her.
Do Not Mark a Virgin Queen
A newly hatched queen must first embark on her mating flights. Marking her before she is mated and laying eggs can interfere with this critical process. Wait until you see a consistent laying pattern before you attempt to mark her.
Making the Right Choice for Your Goals
Your approach to marking can depend on your experience and objectives as a beekeeper.
- If you are a new beekeeper: Marking the queen is highly recommended. It will build your confidence, make inspections far less intimidating, and give you immediate feedback on whether your colony has swarmed or superseded.
- If your primary focus is efficiency: A marked queen is a necessity. The time saved during inspections across multiple hives adds up significantly, allowing you to manage more colonies effectively.
- If you are tracking genetics and performance: Marking is the only reliable way to ensure the queen you are evaluating is the one you introduced. It is essential for any selective breeding program.
Ultimately, a carefully marked queen provides invaluable peace of mind and transforms hive management into a more precise and predictable practice.
Summary Table:
| Key Precaution | Purpose |
|---|---|
| Handle with extreme gentleness | Prevent physical injury to the queen |
| Apply a single, small dot of non-toxic paint to the thorax | Ensure visibility without impairing function |
| Ensure paint is completely dry before release | Prevent scent contamination and hive rejection |
| Avoid paint on antennae, eyes, or wings | Maintain queen's senses and mobility |
| Do not mark a virgin queen | Allow for successful mating flights first |
Optimize your apiary's efficiency with professional-grade supplies from HONESTBEE.
Whether you're a commercial apiary or a beekeeping equipment distributor, our wholesale-focused operations provide the durable, precision tools you need for successful queen marking and hive management.
Contact HONESTBEE today to discuss your supply needs and discover how our equipment can support your beekeeping success.
Visual Guide
Related Products
- Queen Bee Marking Pen POSCA Queen Marking Pens for Beekeeping Bee Markers
- Plastic Long Marker Device for Catching and Marking Bees Queen Bee Marking Tube and Cage
- Queen Bee Marking Tube Cage Bottle Catcher Holder with Clear Plastic Plunger Marker
- One Hand Yellow Queen Marking Catcher Tube Cage Beekeeper Tool Accessory for Queen Bee
- Queen Bee Marking Pen UNI Medium Point for Queen and Bee Marking
People Also Ask
- What is the purpose of using a queen marking pen? Enhance Hive Management and Age Tracking
- How should a queen bee marking pen tip be properly primed? Master the Art of Safe Queen Marking
- What role do specialized marking pens and color-coding systems play in honeybee tracking? Enhance Research Precision
- How should a new paint pen be primed before marking a queen bee? Essential Tips for Safe & Clear Markings
- What type of markers are commonly used for marking Queen bees? Choose the Safe, Non-Toxic Standard