Before inserting a raised queen cell, you must meticulously inspect the nucleus colony and destroy every single queen cell the bees have started on their own. This critical step eliminates competition and prevents the bees from rejecting your chosen cell in favor of one they have already built.
The core challenge is managing the colony's powerful natural instinct. A queenless nucleus will immediately try to raise its own queen, and your primary task is to ensure your introduced cell is their only viable option for requeening.
Why a Queenless Colony is Your Biggest Obstacle
To ensure your raised queen cell is accepted, you must first understand the powerful biological drivers of a queenless honey bee colony. Their immediate and singular focus is to replace their missing queen.
The Instinct to Requeen
Within hours of becoming queenless, worker bees will identify young larvae and begin constructing emergency queen cells around them. This is a deeply ingrained survival instinct.
The Problem of Competing Cells
If you introduce your raised cell into a nucleus that has already started these emergency cells, the workers will almost always favor their own. They will perceive your cell as foreign and destroy it.
The Critical Timing
This process happens quickly. You must perform your inspection and destroy any competing cells at the exact moment you are inserting your new, raised cell. Waiting even a day can be the difference between success and failure.
The Essential Pre-Insertion Checklist
Follow these steps precisely to create the ideal conditions for acceptance. Skipping any of them dramatically increases the risk of failure.
Step 1: Thoroughly Inspect Every Frame
Gently remove each frame from the nucleus colony. Scan the entire surface of the comb, paying special attention to the bottom and side edges where queen cells are often started.
Step 2: Destroy All Natural Queen Cells
You must destroy every single queen cell you find. They are typically larger than worker cells, shaped like a peanut, and hang vertically from the comb. Missing even one can result in the rejection of your introduced cell.
Step 3: Create Space for the Cell
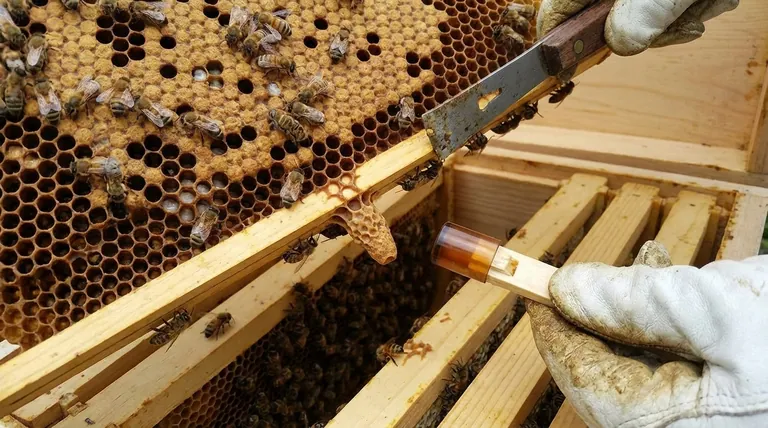
Before returning the frames, leave a gap between two brood combs. This space should be just wide enough to accommodate the bar holding your queen cell without crushing bees or damaging the cell itself.
Step 4: Handle with Extreme Care
A raised queen cell contains a delicate pupa. When you place the cell bar into the prepared gap, lower it very slowly and gently through the clustered bees. Abrupt movements can dislodge or chill the pupa, rendering the cell non-viable.
Understanding the Risks
While the process is straightforward, you must be aware of the colony's state and the consequences of your actions.
The Risk of Discontentment
A queenless colony that has been repeatedly manipulated can become agitated. The bees may be "discontented," and some adult bees may drift to other nearby colonies, slightly weakening the nucleus. This is a minor and manageable risk.
The Consequence of Inaction
The risk of drifting bees is insignificant compared to the consequence of not destroying competing cells. Failing to clear all natural queen cells will almost certainly lead to the destruction of your raised cell, wasting your time and resources.
Making the Right Choice for Your Goal
Your procedure should be guided by your primary objective: successfully introducing a new queen.
- If your primary focus is maximizing the acceptance rate: The non-negotiable step is to meticulously find and destroy all competing queen cells just moments before inserting your new one.
- If your primary focus is ensuring the queen's viability: Handle the raised queen cell with extreme gentleness, as the pupa inside is fragile and easily damaged by rough handling or chilling.
By systematically managing the colony's natural instincts, you create the ideal conditions for your new queen to be accepted and thrive.
Summary Table:
| Step | Key Action | Purpose |
|---|---|---|
| 1 | Thoroughly inspect every frame | Locate all natural queen cells started by the bees. |
| 2 | Destroy all natural queen cells | Eliminate competition to ensure your cell is the only option. |
| 3 | Create space between brood combs | Provide a safe gap to insert the queen cell bar without damage. |
| 4 | Handle the cell with extreme care | Protect the delicate pupa inside from being dislodged or chilled. |
Ensure your queen-rearing success starts with the right equipment. For commercial apiaries and distributors, HONESTBEE supplies durable, precision beekeeping tools designed for efficient colony management. Let our wholesale-focused operations equip your operation for higher productivity and success rates.
Contact HONESTBEE today to discuss your supply needs!
Visual Guide

Related Products
- 5 Frame Wooden Nuc Box for Beekeeping
- 5 Frame Langstroth Poly Nuc Corrugated Plastic Nuc Boxes
- In-Hive Dual Compartment Frame Bee Feeder for Targeted Colony Nutrition
- Automatic Heat Preservation 6 Frame Pro Nuc Box for Honey Bee Queen Mating
People Also Ask
- What are the characteristics of a standard nuc? Essential Guide for Professional Apiaries
- What frames should be moved into the queenless hive when requeening with a nuc? Ensure a Successful Queen Introduction
- What are the options for adding frames to a nuc after taking two frames from the parent colony?
- What is the primary function of five-frame nuclei boxes? Master Early Colony Establishment for Stronger Hives
- What built-in detail do many 5-frame nuc boxes have on the lid? A Guide to Efficient Hive Top Feeding


