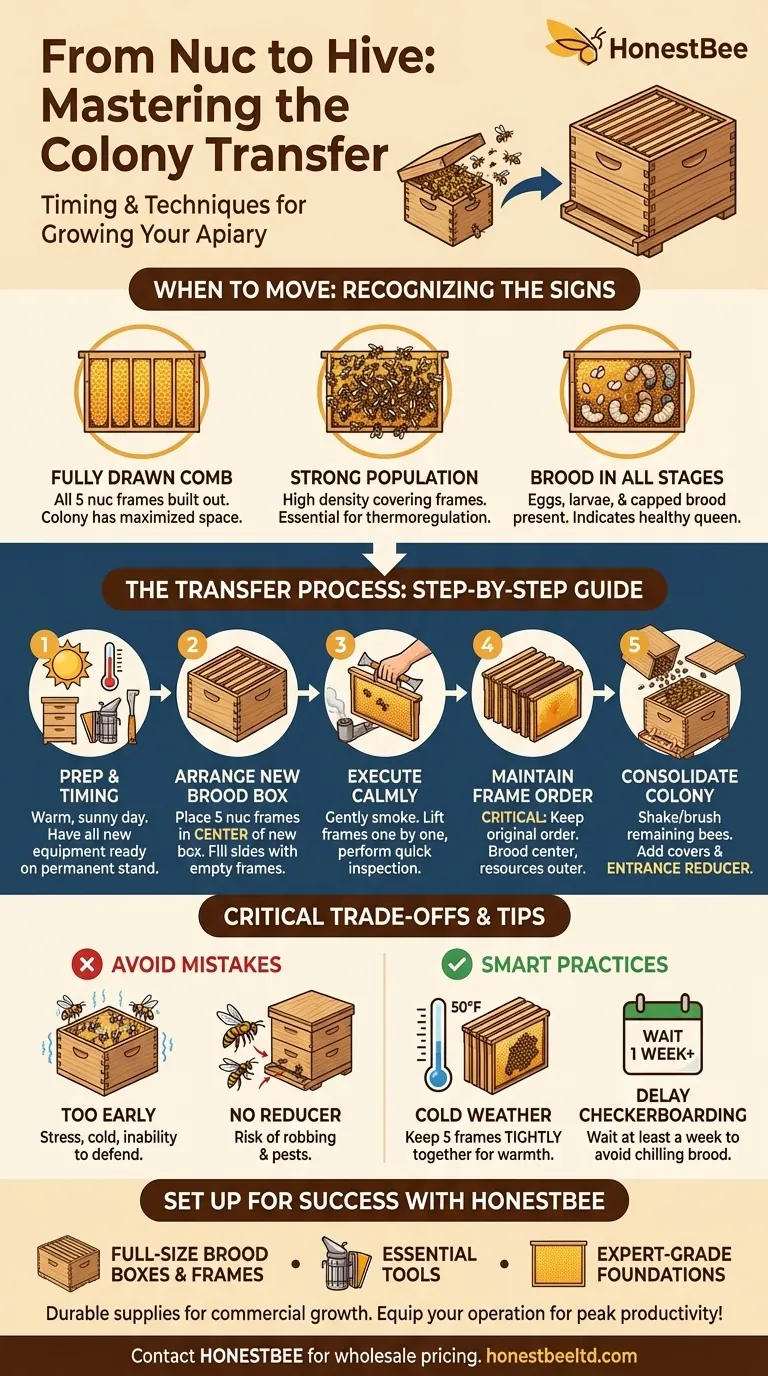
The right time to move your bees from a nucleus (nuc) box to a full-sized hive is when the colony has used nearly all the available space. Specifically, you should perform the transfer once the bees have built comb—or "drawn out"—all five frames in the nuc. Moving them before this point can stress the colony, while waiting too long can induce swarming.
The decision to transfer a nuc is a balance between giving a growing colony the space it needs to expand and not giving it more space than it can effectively manage, defend, and keep warm. Success hinges on recognizing when the colony is strong enough for the move.
Recognizing the Signs: When is Your Nuc Ready?
Transferring a nuc is a critical step in establishing a new hive. Moving them too early can be fatal, while moving them too late risks losing half your bees to a swarm. Look for these definitive signs that the time is right.
The Primary Trigger: Fully Drawn-Out Comb
A nuc is a small, temporary home. The primary signal for a move is when the bees have built out the wax comb on at least four, and ideally all five, of the frames provided.
This indicates the colony has a strong population and is running out of room for the queen to lay eggs and for workers to store resources like pollen and nectar.
A Strong and Bustling Population
When you open the nuc, you should see a high density of bees covering the frames. A weak or sparse population will struggle to thermoregulate and defend the vast space of a new, full-sized brood box. A strong population is essential for a successful transfer.
Brood in All Stages
A healthy, productive colony will have a clear brood pattern established by the queen. During your inspection, you should be able to identify brood in all its stages: tiny eggs, curled larvae, and capped pupae. The presence of all stages across multiple frames confirms your queen is healthy and laying consistently.
The Transfer Process: A Step-by-Step Guide
The transfer itself should be a calm, deliberate process. The goal is to move the colony's home with as little disruption as possible.
Step 1: Prepare Your Equipment and Timing
Choose a warm, sunny day when bees are actively foraging. This minimizes the number of bees in the hive and reduces defensive behavior.
Have all your equipment ready before you begin: your new brood box filled with the correct number of frames, a hive tool, a smoker, and your protective gear. Place the new hive on its permanent stand.
Step 2: Arrange the New Brood Box
Your new hive body will hold ten frames, but your nuc only has five. Place the five frames from your nuc in the center of the new box.
Fill the remaining empty slots on either side with new, empty frames (either with foundation or foundationless, depending on your preference). This setup encourages the bees to expand outward naturally.
Step 3: Execute the Transfer Calmly
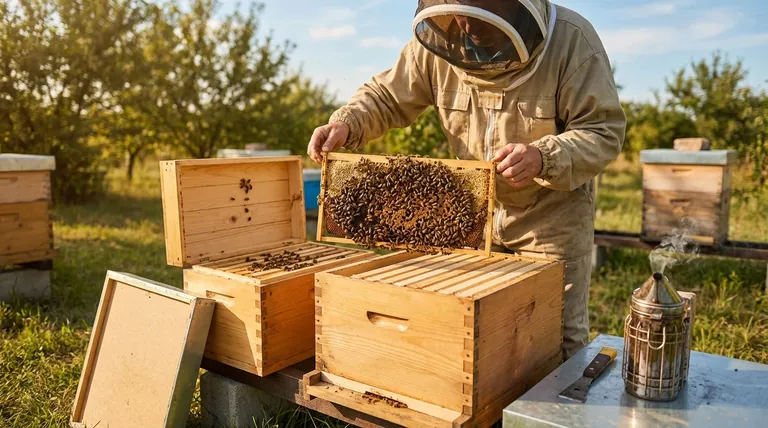
Light your smoker and apply a few gentle puffs of smoke to the nuc entrance to calm the guard bees.
Open the nuc and use your hive tool to gently pry the frames apart. Lift each frame out one by one, perform a quick inspection, and place it into the center of the new hive body.
Step 4: Maintain the Original Frame Order
It is critical to keep the frames in their original order during the transfer. The bees organize their nest with purpose: brood is typically in the center, surrounded by a ring of pollen, with honey on the outermost frames. Maintaining this structure reduces stress on the colony.
Step 5: Consolidate the Colony
After all frames are moved, there will still be bees inside the empty nuc box. Gently shake or brush these remaining bees into the top of the new hive.
Place your inner and outer covers on the new hive and install an entrance reducer on the smallest opening.
Understanding the Key Trade-offs
Simply moving the frames is not enough. Understanding the principles behind certain steps will help you avoid common and costly mistakes.
The Risk of Transferring Too Early
Moving a colony that is not yet strong enough is a frequent error. A small cluster of bees in a large box cannot maintain the proper temperature for raising brood. They will also be unable to defend the large entrance from robbing bees or pests, putting the entire colony at risk.
The Critical Role of the Entrance Reducer
Using an entrance reducer is non-negotiable for a newly transferred nuc. The small entrance is easier for the colony's limited number of guard bees to defend against intruders. It helps the new colony protect its resources and establish itself without being overrun.
Cold Weather Considerations
If nighttime temperatures are expected to drop below 50°F (10°C), it is vital that the five frames you transferred are pushed tightly together in the center of the box. This allows the bee cluster to more efficiently generate and conserve heat to protect the vulnerable brood. Do not separate them with new frames in cool weather.
To Checkerboard or Not?
Checkerboarding is the practice of alternating drawn-out frames with new foundation frames to encourage rapid comb building. While effective for strong hives in warm weather, you should wait at least a week after transferring your nuc to consider this. Doing it too soon can break up the brood nest, chilling the larvae and severely stressing the colony.
Making the Right Choice for Your Colony
Your approach should be guided by your primary goal for the colony's health and your local conditions.
- If your primary focus is minimizing stress: Transfer on a warm, calm day and be meticulous about keeping the nuc frames in their original order.
- If your primary focus is maximizing growth: Do not rush the transfer; wait until all five nuc frames are fully drawn with comb and covered in bees.
- If you are beekeeping in a cooler climate: Always use an entrance reducer and ensure the original frames are kept together as a single block until the colony is strong and the weather is consistently warm.
By properly timing the move and carefully managing the new environment, you are setting your colony up for a season of healthy growth and productivity.
Summary Table:
| Key Indicator | What to Look For | Why It Matters |
|---|---|---|
| Drawn Comb | All 5 nuc frames fully built out with wax comb | Colony is strong and has maximized its current space |
| Bee Population | High density of bees covering the frames | Ensures colony can thermoregulate and defend a larger hive |
| Brood Pattern | Presence of eggs, larvae, and capped brood across frames | Confirms a healthy, laying queen and productive colony |
| Timing | Warm, sunny day with active foraging | Minimizes disruption and defensive behavior during transfer |
Set Your Apiary Up for Success with HONESTBEE
A successful nuc transfer relies on having the right equipment at the right time. As a trusted wholesale supplier for commercial apiaries and beekeeping equipment distributors, HONESTBEE provides the durable, high-quality supplies you need to manage colony growth effectively.
We offer:
- Full-Size Brood Boxes & Frames: Built for durability to support expanding colonies season after season.
- Essential Tools: Hive tools, smokers, and protective gear designed for commercial-scale operations.
- Expert-Grade Foundations & Equipment: Help your bees build comb efficiently and maintain hive health.
Ready to equip your operation for peak productivity? Let's discuss your bulk supply needs.
Contact HONESTBEE today for wholesale pricing and to place your order.
Visual Guide
Related Products
- 4 Frame Plastic Nuc Boxes for Beekeeping Bee Nuc Box
- Portable Bee Mating Hive Boxes Mini Mating Nucs 8 Frames for Queen Rearing
- 5 Frame Wooden Nuc Box for Beekeeping
- Styrofoam Mini Mating Nuc Box with Frames Feeder Styrofoam Bee Hives 3 Frame Nuc Box
- Automatic Heat Preservation 6 Frame Pro Nuc Box for Honey Bee Queen Mating
People Also Ask
- Why is a nuc box excellent for starting a new honey bee colony? Maximize Survival & Rapid Growth
- What are the advantages of four-frame nucleus boxes for parasite research? Boost Experimental Precision and Data Power
- What are nuc boxes used for in beekeeping? Essential Tools for Queen Rearing and Colony Growth
- What are the practical uses for an empty nuc box? Essential Tools for Swarm Control and Apiary Management
- What are the main types of boxes used in beekeeping? Choose the Right Hive System for Your Apiary