
Preparation for Bee Installation
Essential Equipment and Setup
Before installing your nucleus colony bees, it’s crucial to ensure that all necessary equipment is ready and properly arranged in the bee yard. Here’s a checklist of essential items:
-
Protective Gear: Safety is paramount when working with bees. A beekeeping helmet and veil are essential to protect your head and face from stings, particularly around sensitive areas like the eyes, nose, and lips. Additional protective clothing, such as jackets, coveralls, or full-body bee suits, can provide extra safety. While some experienced beekeepers may choose to work without gloves, beginners are advised to wear them for added protection. Always check zippers and folds for stray bees after finishing to ensure safety.
-
Hive Tools: These are indispensable for opening hives, prying apart frames, and scraping off excess wax or propolis. Ensure you have a reliable hive tool on hand.
-
Bee Feed: Prepare a supply of bee feed, such as sugar syrup, to support the colony during the initial installation period.
-
Pollen Substitutes: If natural pollen is scarce, pollen substitutes can provide essential nutrients for the bees.
-
Assembled and Painted Equipment: Ensure all hive components are assembled and painted (if necessary) before installation. This includes the deep hive body, frames, and any additional boxes.
Pre-Installation Bee Care
Proper care of your bees before installation is vital to their health and success in the new hive. Here are some key steps to follow:
-
Secure Transport: Transport your bees in a secure, well-ventilated container to minimize stress and prevent escape. Ensure the container is kept in a quiet, dark place during transit.
-
Temperature Control: If you cannot install the bees immediately, maintain them in a quiet, dark place at a temperature between 50°F and 70°F. This helps keep the bees calm and reduces the risk of overheating or chilling.
-
Feeding: Provide the bees with sugar syrup during the pre-installation period to ensure they have enough energy and nutrients. This is especially important if the bees have been in transit for an extended period.
By following these steps, you can ensure that your bees are well-prepared for installation and have the best possible start in their new hive.
Step-by-Step Installation Process
Initial Setup and Smoking
Begin by preparing your smoker, ensuring it is filled with appropriate fuel and ignited to produce a steady stream of smoke. Smoking the bees helps calm them, making the installation process smoother and safer. Position the nucleus (nuc) box containing your bees next to the deep hive body where they will be transferred. This proximity minimizes disruption and allows for an efficient transition.
Transferring Frames
Transferring frames is a critical step in the installation process. Here’s how to do it effectively:
-
Removing Frames from the Deep Hive Body: Start by carefully removing all frames from the deep hive body to create space for the new frames from the nuc box.
-
Transferring Frames from the Nuc Box: Gently remove one of the outer frames from the nuc box and place it over the top of the deep hive body adjacent to an empty frame. Ensure the frames remain in their original order to maintain the bees' organization and reduce stress on the colony.
-
Inspecting and Placing Frames: As you transfer each frame, inspect it for signs of brood, pollen, and honey. Carefully place each frame into the deep hive body, ensuring they are snug and without extra space. Repeat this process until all frames are transferred, placing the five frames in the middle and adding any remaining frames to either side.
-
Optional: Placing Pollen Patties: If needed, place pollen patties on top of the frames to provide additional nutrition for the bees.
Post-Transfer Care
After transferring the frames, it’s essential to monitor the colony to ensure they are settling in well. Inspect the colony 4-7 days post-installation to check for brood development and overall health. Look for signs of a healthy queen, such as eggs and larvae, and ensure the bees are building comb and storing food properly. This early inspection helps identify any potential issues and allows for timely intervention.
By following these steps, you can ensure a successful installation of your nucleus colony bees, setting the stage for a thriving hive.
Post-Installation Care
Feeding and Monitoring
After successfully installing your nucleus colony, the next critical step is to ensure proper feeding and monitoring. For the first three weeks, it’s essential to feed the bees heavily to help them establish their new home. Sugar-water mix is highly recommended for this purpose. This feeding regimen provides the colony with the necessary energy to build comb, care for brood, and store food for future use.
Around 10-14 days post-installation, re-check the queen to ensure she is healthy and laying eggs. This is a crucial step in confirming the colony’s progress. A thriving queen is the backbone of a successful hive, and her productivity directly impacts the colony’s growth and stability.
Common Mistakes to Avoid
Even experienced beekeepers can make mistakes during the post-installation phase. Here are some common pitfalls to avoid:
-
Rushing the Installation: Taking your time during the installation process ensures that the bees are transferred safely and without unnecessary stress. Rushing can lead to damaged frames or agitated bees.
-
Improper Hive Placement: The location of your hive plays a significant role in its success. Avoid placing the hive in areas with poor drainage, excessive shade, or high traffic. Instead, choose a spot with morning sunlight and protection from strong winds.
-
Neglecting Post-Installation Checks: Regular inspections are vital to monitor the colony’s health and address any issues promptly. Skipping these checks can lead to unnoticed problems, such as queen failure or disease, which can jeopardize the entire hive.
By avoiding these common mistakes and adhering to a structured care routine, you can set your nucleus colony on the path to thriving and productivity.
Choosing the Right Bee Species
Comparison of Bee Species
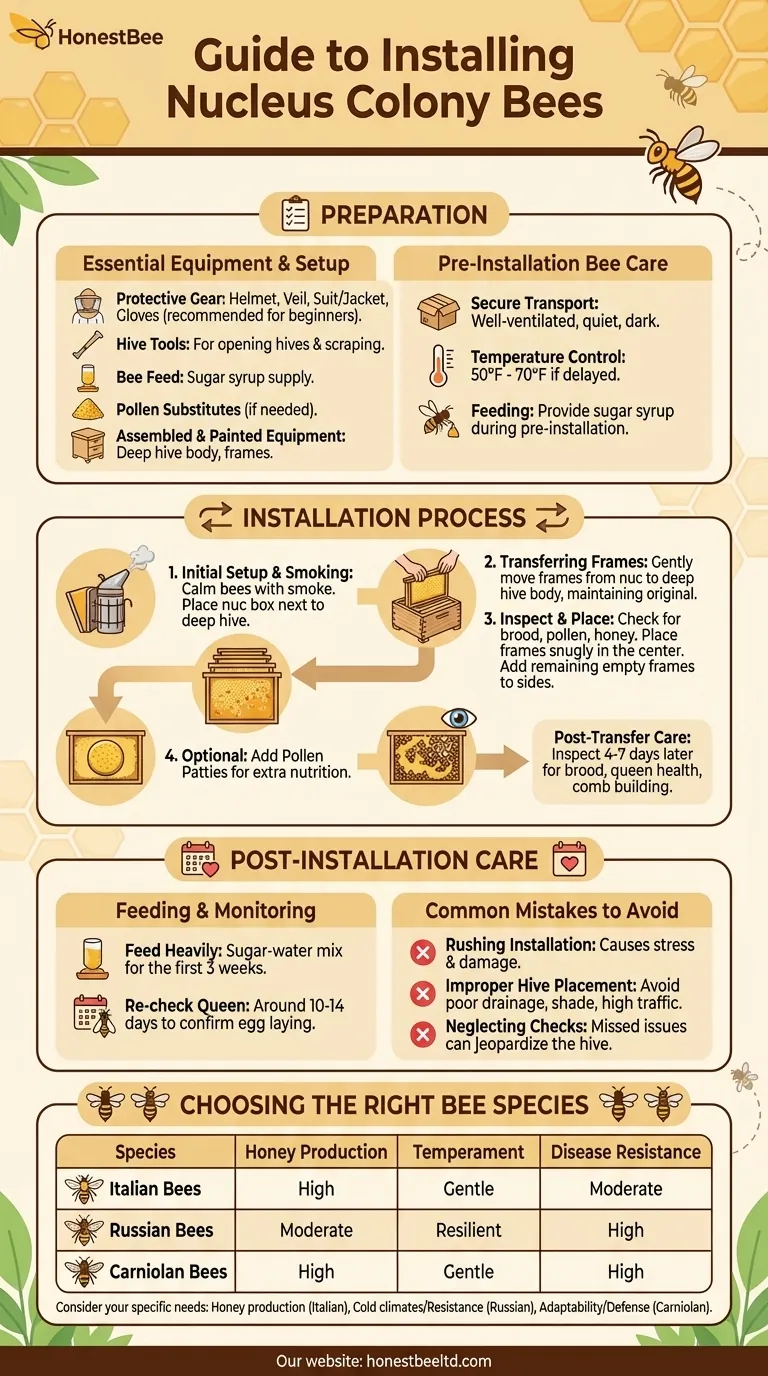
When selecting the right bee species for your apiary, it’s essential to consider factors such as honey production, temperament, and disease resistance. Three of the most popular bee species for beekeepers are Italian, Russian, and Carniolan bees. Each has unique characteristics that make them suitable for different environments and beekeeping goals.
Italian Bees (Apis mellifera ligustica)
- Honey Production: Italian bees are known for their prolific honey production. They start brood production earlier in the season, which allows them to build up their population quickly and take advantage of early nectar flows.
- Temperament: These bees are generally gentle and easy to manage, making them a favorite among beginner beekeepers.
- Disease Resistance: While Italian bees are hardy, they can be more susceptible to certain diseases and pests, such as Varroa mites, compared to other species.
Russian Bees (Apis mellifera caucasica)
- Honey Production: Russian bees are moderate honey producers. They tend to be more conservative in their brood rearing, which can result in slower population growth but also less strain on resources during lean times.
- Temperament: Russian bees are known for their resilience and ability to thrive in colder climates. They can be slightly more defensive than Italian bees but are still manageable with proper care.
- Disease Resistance: One of the standout features of Russian bees is their natural resistance to Varroa mites and other diseases, making them a low-maintenance option for beekeepers.
Carniolan Bees (Apis mellifera carnica)
- Honey Production: Carniolan bees are excellent honey producers, particularly in areas with short but intense nectar flows. They are quick to ramp up or reduce brood rearing based on food availability, which allows them to adapt to changing conditions.
- Temperament: These bees are generally gentle and easy to handle, though they have a higher tendency to swarm compared to Italian bees.
- Disease Resistance: Carniolan bees are known for their strong defense against hive invaders and insects, making them a robust choice for beekeepers looking to minimize hive threats.
| Species | Honey Production | Temperament | Disease Resistance |
|---|---|---|---|
| Italian Bees | High | Gentle | Moderate |
| Russian Bees | Moderate | Resilient | High |
| Carniolan Bees | High | Gentle | High |
Choosing the right bee species depends on your specific needs and local conditions. Italian bees are ideal for those focused on honey production, Russian bees are suited for colder climates and disease resistance, and Carniolan bees offer a balance of adaptability and strong hive defense.
Visual Guide
Related Products
- 5 Frame Wooden Nuc Box for Beekeeping
- Automatic Heat Preservation 6 Frame Pro Nuc Box for Honey Bee Queen Mating
- In-Hive Dual Compartment Frame Bee Feeder for Targeted Colony Nutrition
- 4 Frame Plastic Nuc Boxes for Beekeeping Bee Nuc Box
- Styrofoam Mini Mating Nuc Box with Frames Feeder Styrofoam Bee Hives 3 Frame Nuc Box
Related Articles
- How Local Adaptation and Queen Integration Define Beekeeping Success
- Architecting Royalty: The Nuc Box as a Queen's Crucible
- How Smaller Nuc Box Frames Improve Brood Health Through Thermal Regulation
- How to Successfully Requeen Hives Using the 5-Frame Nuc Method: A Beekeeper’s Guide
- The Architect's Dilemma: How a Nuc Box Solves a Honeybee Swarm's Housing Crisis


