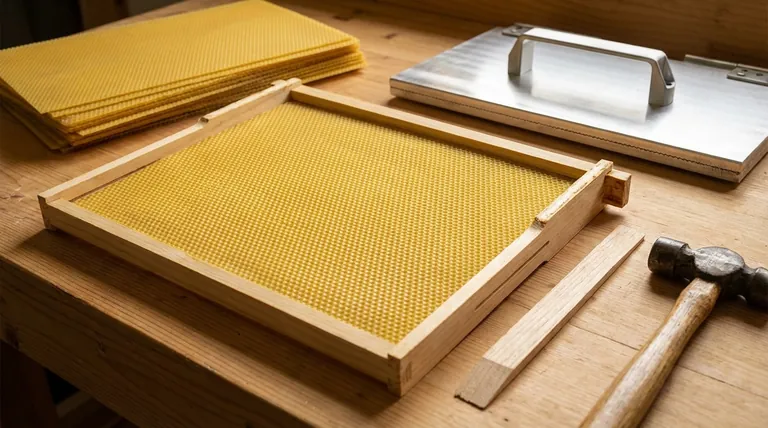
In short, wax foundation is installed by fitting it into the grooves of a wooden frame and securing it in place. The most common method involves a "wedge top" frame, where the foundation sheet is hung from hooks and a wooden wedge is nailed in to hold it securely.
The core objective is not just to insert the wax, but to create a perfectly centered and rigid guide for your bees. A securely installed foundation prevents sagging and warping, which is essential for encouraging bees to build the straight, uniform comb needed for a healthy and manageable hive.
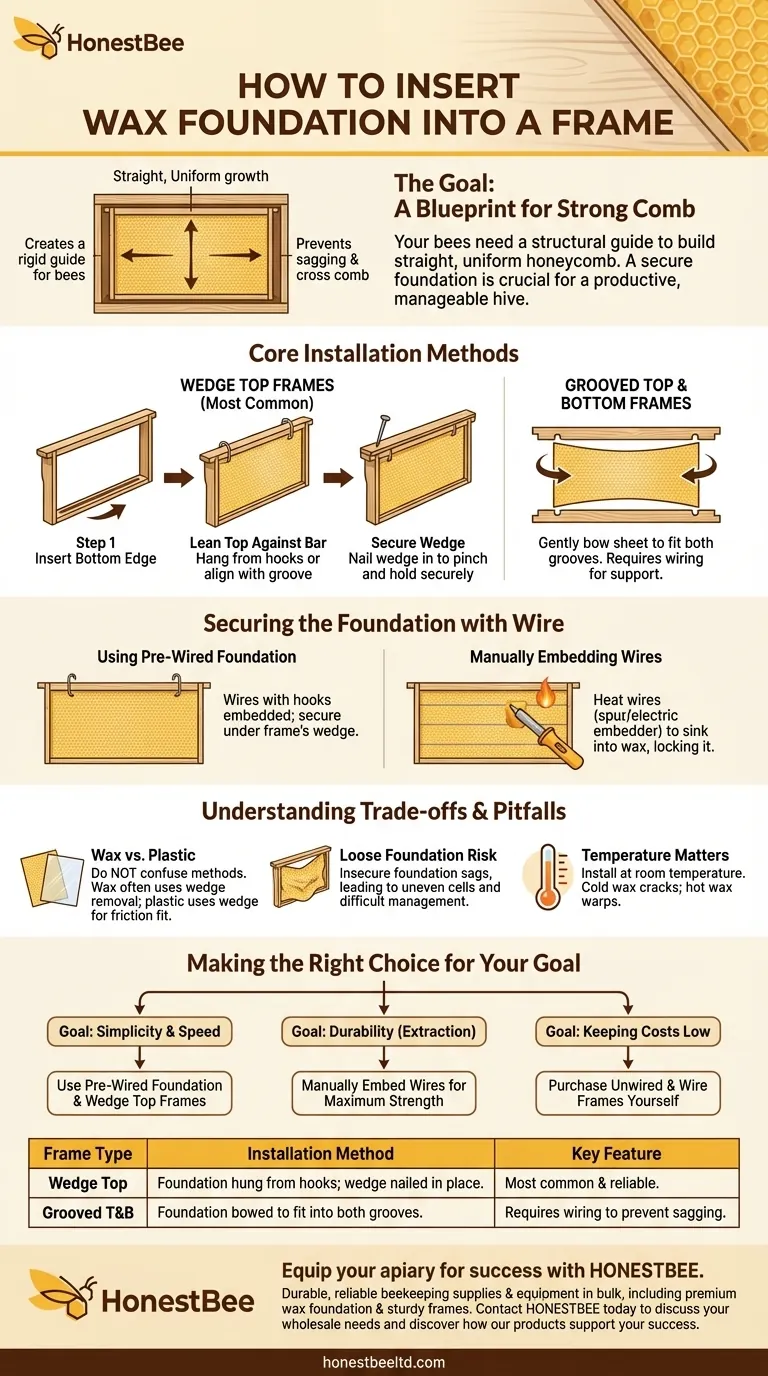
The Goal: A Blueprint for Strong Comb
Before touching a frame, understand the purpose of foundation. You are giving your bees a blueprint. A well-installed sheet of wax foundation provides the structure they need to build straight, even honeycomb.
Without this guide, bees may build "cross comb" that connects multiple frames, making hive inspections impossible without destroying the comb and stressing the colony. A secure foundation is the first step toward a productive and easy-to-manage hive.
Core Installation Methods
The exact method depends on the type of wooden frame and wax foundation you are using. Most modern setups use a combination of grooves and wires.
For Wedge Top Frames (Most Common)
This design is popular for its simplicity and reliability. The top bar of the frame has a removable wooden strip, or "wedge."
First, insert the bottom edge of the wax foundation sheet into the groove on the inner side of the frame's bottom bar.
Next, lean the top of the foundation sheet against the frame's top bar. If your foundation has built-in wire hooks, hang these over the small nails or into the groove of the top bar.
Finally, place the wooden wedge strip back into its slot on the top bar and nail it in place with small frame nails. This wedge pinches the foundation and wires, holding everything tight.
For Grooved Top and Bottom Frames
Some frames have a simple groove in both the top and bottom bars, with no removable wedge.
For this type, you gently bow the wax sheet to fit it into the top and bottom grooves simultaneously. This method relies on a snug fit and often requires additional support from wiring to prevent sagging.
Securing the Foundation with Wire
Wiring is what gives wax foundation its structural integrity, preventing it from sagging under its own weight or the heat of the hive.
Using Pre-Wired Foundation
The easiest method is to use foundation sheets that already have vertical wires embedded in the wax. These wires often have small hooks at the top that are secured under the frame's wedge, as described above.
Manually Embedding Wires
If you use unwired foundation, you must wire the frame first and then embed those wires into the wax. You can do this by heating the wires with a spur embedder (a small, heated wheel) or a low-voltage electric embedder.
As the hot wire sinks slightly into the surface, the melted wax cools around it, locking the sheet firmly in place.
Understanding the Trade-offs & Common Pitfalls
Proper installation is critical. Mistakes at this stage can lead to major problems later.
Wax vs. Plastic Foundation
Do not confuse the installation methods. Plastic foundation is rigid and snaps into a frame. With wax, you often remove the wedge piece from a wedge-top frame to install the foundation. With plastic, that same wedge piece is left in place to provide a friction fit.
The Risk of a Loose Foundation
A foundation that is not securely wired or wedged in place will inevitably sag. This creates uneven cells that the queen may not lay eggs in and can lead to a messy, difficult-to-manage comb structure.
Temperature Matters
Wax is a natural material that changes with temperature. Trying to install foundation on a very cold day can cause the brittle wax to crack. Conversely, on a very hot day, it can become too soft and warp easily. Room temperature is ideal for installation.
Making the Right Choice for Your Goal
Your choice of foundation and installation method depends on your priorities.
- If your primary focus is simplicity and speed: Use pre-wired wax foundation with hook and wedge-top frames for the most straightforward assembly.
- If your primary focus is durability for honey extraction: Manually embedding wires, or even cross-wiring the frame, provides the maximum strength needed to withstand the high rotational forces of a honey extractor.
- If your primary focus is keeping costs low: Purchasing unwired foundation and wiring frames yourself is often cheaper but requires more labor and specialized tools like an embedder.
A properly assembled frame is a gift to your bees and your future self.
Summary Table:
| Frame Type | Installation Method | Key Feature |
|---|---|---|
| Wedge Top Frame | Foundation hung from hooks; wedge nailed in place. | Most common and reliable method. |
| Grooved Top & Bottom Frame | Foundation bowed to fit into both grooves. | Requires wiring to prevent sagging. |
Equip your apiary for success with HONESTBEE.
A properly installed foundation is the blueprint for a healthy, productive hive. Whether you're a commercial beekeeper managing thousands of hives or a distributor supplying the industry, the quality of your equipment matters.
HONESTBEE supplies durable, reliable beekeeping supplies and equipment in bulk, including premium wax foundation and sturdy frames designed for efficient assembly and long-term performance. Our wholesale-focused operations ensure you get the equipment you need to build strong, manageable hives season after season.
Ready to strengthen your operation? Contact HONESTBEE today to discuss your wholesale needs and discover how our products support your success.
Visual Guide
Related Products
- Notebook Style Beeswax Foundation Mould Wax Foundation Mold
- Beeswax Machine Press Embosser Wax Foundation Mold Printer Bee Hive Equipment Making Sheet
- Colorful Silicone Beeswax Foundation Mold Mould for Beekeeping
- Manual Beeswax Comb Foundation Machine Wax Foundation Mill Embossing Machine
- Beeswax Foundation Sheets Beehive Foundation for Wholesale
People Also Ask
- How do beeswax foundation molds facilitate the construction of standardized honeycombs? Optimize Your Apiary Efficiency
- How can beeswax value-addition processes be utilized to increase beekeeping revenue? Boost Your Apiary Profitability
- What is a foundation mold used for? Turn Your Wax Cappings into High-Quality Foundations
- What are the negative consequences of using old or contaminated beeswax in foundations? Protect Your Hive Today
- How do you use the Foundation Mold to create beeswax foundation? Master DIY Beekeeping with Precision


