The core process of releasing bees into a top bar hive is straightforward: you prepare the hive by removing several bars, secure the queen cage, pour the bees into the open space, and then close the hive. The success of this operation, however, hinges on providing immediate and continuous food to fuel the critical task of building their new home from scratch.
Your goal is not just to get the bees inside the box, but to create an environment that minimizes stress and kickstarts wax production. A successful installation focuses on queen acceptance, providing ample food, and protecting the vulnerable new colony from the start.
Preparing Your Top Bar Hive for Arrival
Before your bees arrive, your hive must be ready to receive them. Proper preparation reduces the stress on the colony and increases the odds of them staying and thriving.
Position the Hive and Open One Entrance
Your hive should already be in its final, permanent location. Before introducing the bees, ensure all entrances are closed except for one, which should be set to its smallest opening. This helps the new colony defend its home.
Install the Divider Board
A top bar hive is a large, empty space for a new package of bees. Place a divider board (also called a follower board) inside the hive to reduce the initial volume. This gives the bees a smaller, more manageable space to heat and control. A typical starting space is about 8-10 bars wide.
Remove Several Top Bars
Gently remove 5 to 6 top bars from the center of the section you've created with the divider board. This creates the open cavity where you will pour the bees. Set the bars aside in the order you removed them so you can replace them correctly.
Place an In-Hive Feeder
A new colony has no honey reserves and must build all its own comb. Place an in-hive feeder at one end of the section, typically right next to the divider board. Fill it with a 1:1 sugar water solution (by weight).
The Installation Process: Step-by-Step
This process works best when done in the late afternoon on a calm, mild day. This encourages the bees to settle in overnight rather than immediately taking flight.
Prepare the Bee Package
Your bees will arrive in a screened box with a can of sugar syrup and a small cage containing the queen. Gently mist the outside of the screen with sugar water. This gives the bees a quick meal and encourages them to groom, which calms and occupies them.
Secure the Queen Cage
Locate the queen cage, which is often hanging from a tab at the top of the package. Remove it and check that the queen is alive. The cage will have a small hole plugged with a hard white candy.
Use a screw, thumb tack, or staple to attach the queen cage to the center of one of your top bars. The cage should hang down between the bars, with the candy-plugged end pointing downwards or sideways so any attendant bees who die don't block her exit.
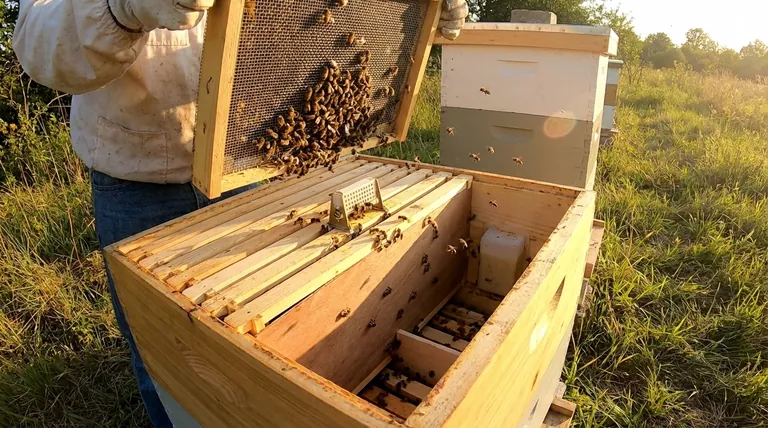
Gently Release the Bees
Place the top bar with the queen cage back into the center of the open space in the hive. Now, hold the bee package over the hive, pull out the feeder can, and give the package a firm, confident shake. Most of the bees will fall into the cavity.
You can gently tap the sides of the package to dislodge the remaining bees, or simply leave the open package inside the hive for them to crawl out on their own.
Replace Top Bars and Close the Hive
Carefully replace the remaining top bars in their original order, being mindful not to crush bees. Once all bars are in place and the hive is fully enclosed, put the main cover on. The installation is complete.
Understanding the Pitfalls and Best Practices
A successful installation is just the beginning. The first two weeks are a critical period where the colony is at its most vulnerable.
The Risk of a Leaky Feeder
Ensure your feeder is well-sealed and does not leak. A pool of sugar syrup at the bottom of the hive can drown bees, chill the colony, and even kill the queen if she becomes trapped.
Why Continuous Feeding is Non-Negotiable
Bees consume an enormous amount of sugar to produce beeswax. A new colony in a top bar hive has zero drawn comb, so they must build everything. Keep the feeder full of 1:1 sugar water continuously for the first several weeks, or until they have drawn out 5-6 full combs.
Protecting a Weak Colony
A new package is small and cannot defend a large entrance. Keeping the entrance reduced to its smallest size is essential to prevent robbing by stronger bees from nearby hives, which can quickly decimate a new colony.
Don't Disturb the New Colony
Resist the urge to inspect the hive too soon. After installation, leave the bees completely alone for 5-7 days. This gives them time to release the queen from her cage and accept her. A quick check after a week to confirm the queen is out and to refill the feeder is all that is needed.
Making the Right Choice for a Strong Start
Your actions during installation directly impact the colony's long-term health and productivity. Prioritize the colony's foundational needs.
- If your primary focus is queen acceptance: Attach the queen cage securely to a center bar and leave the colony undisturbed for a full week to allow the bees to release her naturally.
- If your primary focus is rapid comb building: Provide a continuous, uninterrupted supply of 1:1 sugar syrup and use a divider board to give the colony a small, manageable space to work.
- If your primary focus is colony security: Immediately reduce the hive entrance to its smallest opening and ensure your feeder does not leak.
A calm, methodical, and supportive installation provides the strong foundation your bees need to build a thriving colony.
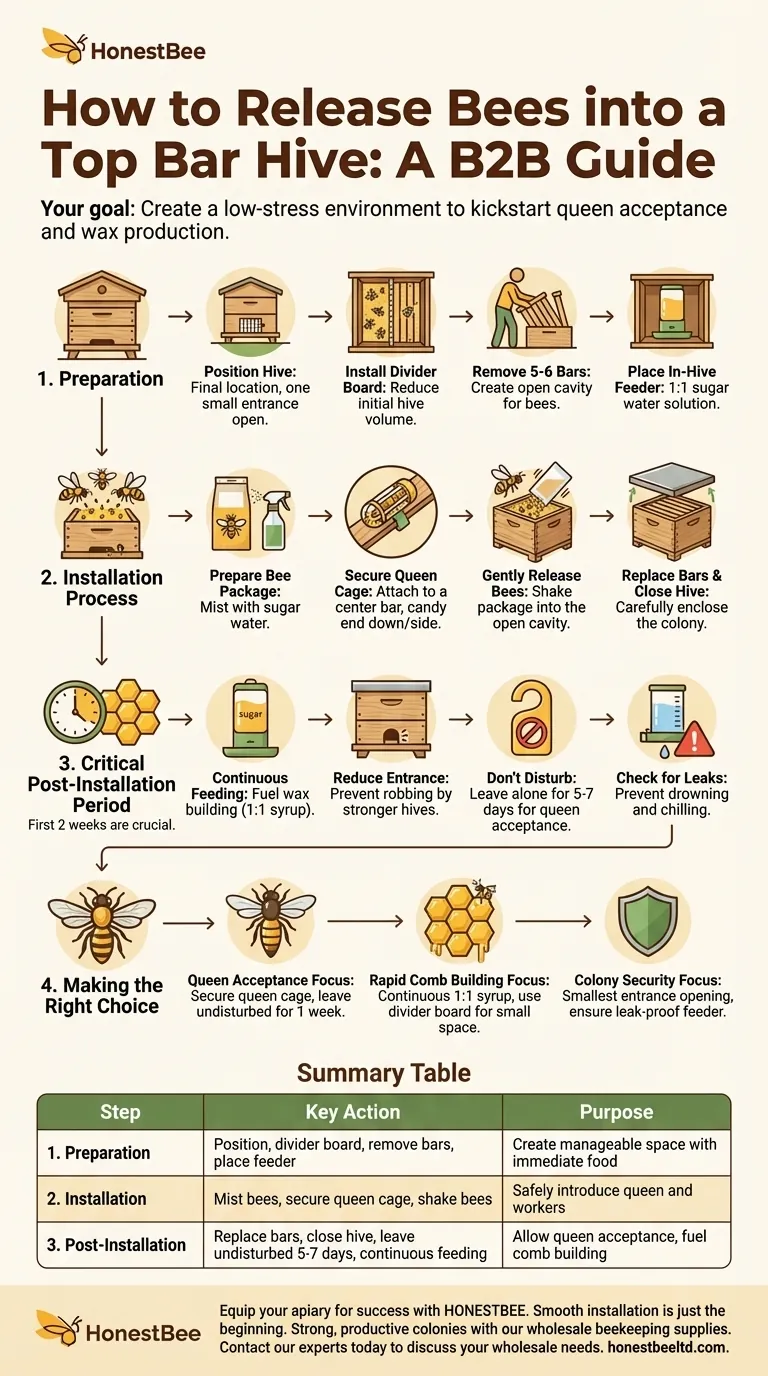
Summary Table:
| Step | Key Action | Purpose |
|---|---|---|
| 1. Preparation | Position hive, install divider board, remove 5-6 bars, place feeder. | Create a manageable, defensible space with immediate food access. |
| 2. Installation | Mist bees, secure queen cage to a center bar, shake bees into hive. | Safely introduce the queen and worker bees into their new home. |
| 3. Post-Installation | Replace bars, close hive, leave undisturbed for 5-7 days, provide continuous feeding. | Allow queen release and acceptance, and fuel critical comb building. |
Equip your apiary for success with HONESTBEE. A smooth installation is just the beginning. Keep your colonies strong and productive with our wholesale-focused beekeeping supplies and equipment, trusted by commercial apiaries and distributors. Contact our experts today to discuss your wholesale needs and build a thriving operation.
Visual Guide
Related Products
- Top Bar Beehive for Beekeeping Wholesales Kenya Top Bar Hive
- Long Langstroth Style Horizontal Top Bar Hive for Wholesale
- HONESTBEE Professional Hive Top Bee Feeder Feeding Solution
- HONESTBEE Top Bar & Bottom Bar Forming Machine | Bee Frame Machine
- Professional Hive Top Bee Feeder for Beekeeping
People Also Ask
- What are the main differences between a top bar hive and a Langstroth hive? A Guide to Choosing Your Hive
- How does comb construction differ between a top bar hive and a Langstroth hive? Choose the Best Method for Your Apiary
- Why do top bar hives require beekeepers to detach comb? Master the Detach-then-Lift Technique for Comb Safety
- How does the design of a top bar hive minimize disturbance to the bees during inspection? Achieve a Calmer, More Natural Approach
- How is burr comb and propolis removed from a top bar hive? A Practical Guide for Hive Maintenance