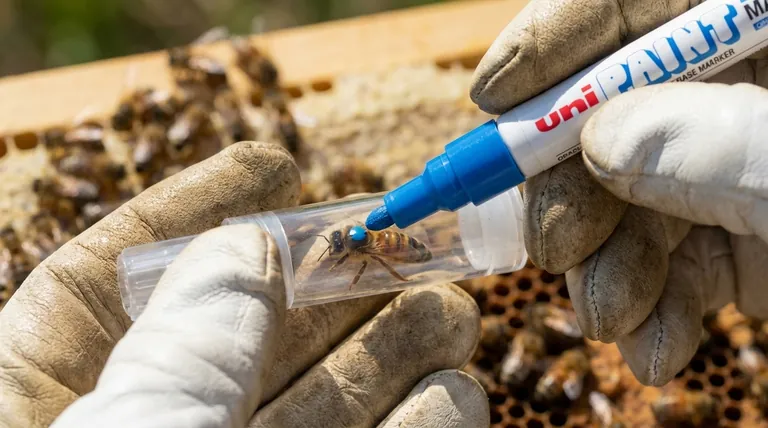
Applying the right pressure when marking a queen bee is more about a gentle touch than it is about force. The proper technique involves preparing your marker correctly and using a slow, deliberate motion to place a small dot of paint on her thorax. The goal is to be so gentle that the queen barely notices the action.
Successful queen marking is not just about the moment of contact. It is a process that relies on having the right tools, proper preparation, and a calm technique to ensure the queen’s safety and improve your ability to manage the hive.
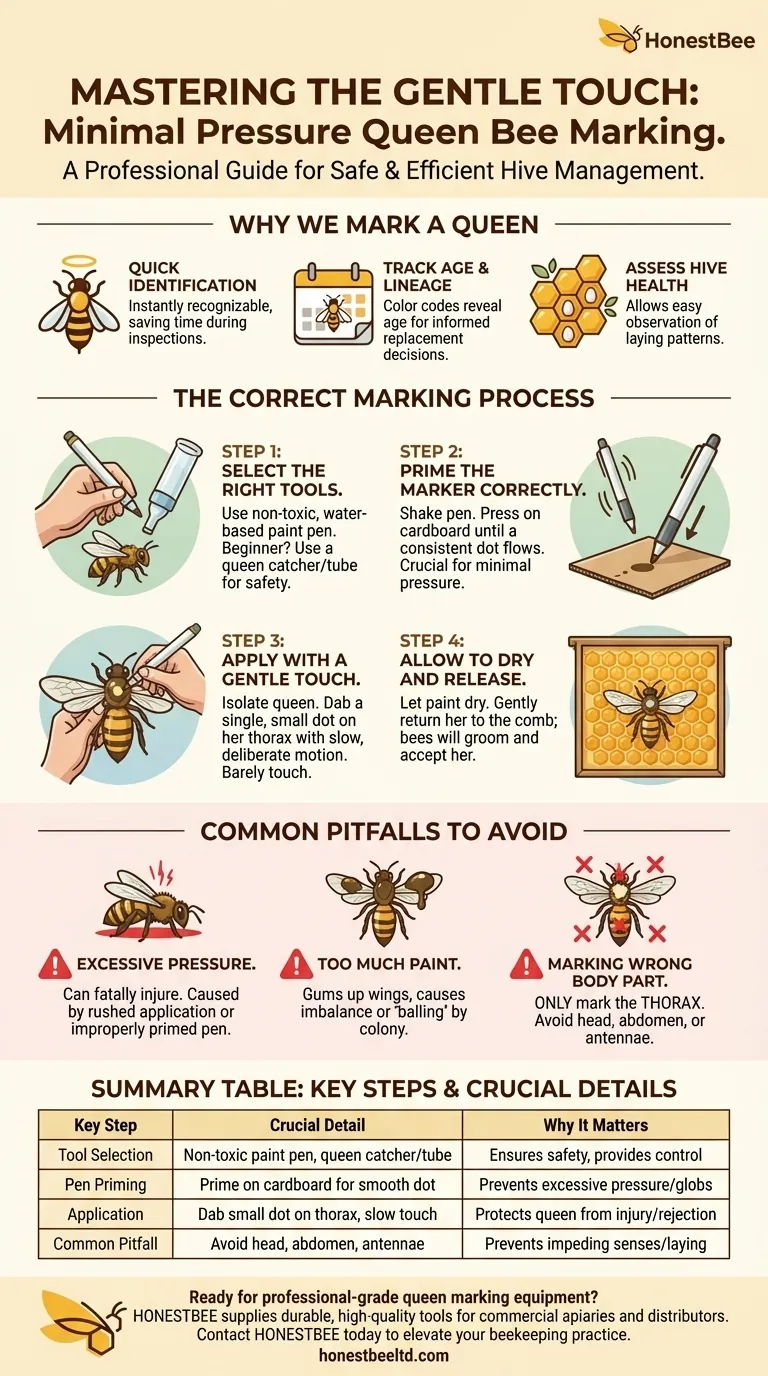
Why We Mark a Queen Bee
Marking a queen is a fundamental practice for efficient and effective hive management. It provides immediate visual confirmation of her presence and health.
For Quick Identification
A marked queen is instantly recognizable among thousands of other bees. This saves a significant amount of time and reduces disturbance to the colony during routine inspections.
To Track Her Age and Lineage
Beekeepers often use a specific color code that corresponds to the year the queen hatched. This system allows you to know her age at a glance, which is crucial for deciding when she might need to be replaced.
To Assess Hive Health
Quickly finding the queen allows you to assess her laying pattern. A solid, consistent brood pattern is a key indicator of a healthy, productive queen and a thriving colony.
The Correct Marking Process from Start to Finish
Achieving a safe, minimal-pressure mark requires a methodical approach. Rushing the process is the most common cause of mistakes.
Step 1: Select the Right Tools
Your choice of marker is critical. Use a high-quality, non-toxic, water-based paint pen. These are designed to be safe for bees and provide a vibrant, long-lasting mark.
For beginners, using a one-handed queen catcher or a queen marking tube is highly recommended. These tools gently immobilize the queen, making the process much easier and safer than holding her by hand.
Step 2: Prime the Marker Correctly
This step is essential for controlling the paint flow and is the key to using "minimal pressure." Never use a new pen directly on the queen.
First, shake the pen vigorously to mix the paint. Then, press the nib repeatedly on a piece of cardboard or paper until it is fully saturated and releases a smooth, consistent dot of paint. This ensures you won't have to press hard on the queen or release a sudden, large glob of paint.
Step 3: Apply the Mark with a Gentle Touch
Once the queen is isolated and gently secured, bring the primed pen to her thorax—the hard middle section of her body, between her wings.
Apply a single, small dot of paint with a slow and deliberate touch. The pressure should be just enough to transfer the paint. Think of it as dabbing, not writing.
Step 4: Allow to Dry and Release
Give the paint a few moments to dry before releasing the queen. If you used a catcher, you can gently release her directly onto the comb.
Return the frame to the hive carefully. The other bees will typically groom her and quickly accept her with the new mark.
Common Pitfalls and How to Avoid Them
Understanding what can go wrong is as important as knowing the correct technique. A calm, prepared beekeeper is a safe beekeeper.
The Danger of Excessive Pressure
The most obvious risk is applying too much force, which can crush or fatally injure the queen. This is almost always caused by an improperly primed pen or a rushed, unsteady hand.
Applying Too Much Paint
A large glob of paint can be harmful. It can gum up her wings, interfere with her balance, or cause the other bees to see her as foreign and attack her, a behavior known as "balling."
Marking the Wrong Body Part
Only mark the thorax. Never apply paint to her head, abdomen, or antennae. Paint on these sensitive areas can impede her senses, breathing, or egg-laying ability.
Making the Right Choice for Your Goal
Your approach should be tailored to your experience level and comfort with handling bees.
- If your primary focus is safety as a new beekeeper: Always use a queen catcher or marking tube and practice on drones (male bees) first to perfect your technique.
- If you are an experienced beekeeper comfortable with handling: You may choose to gently hold the queen by her thorax, but always ensure your pen is perfectly primed to prevent accidents.
- If your primary focus is efficient hive management: A marked queen is essential for making quick, informed decisions about your colony's health and productivity.
With careful preparation and a steady hand, marking your queen will become a routine and invaluable part of your beekeeping practice.
Summary Table:
| Key Step | Crucial Detail | Why It Matters |
|---|---|---|
| Tool Selection | Use a non-toxic, water-based paint pen and a queen catcher/tube. | Ensures bee safety and provides control for a gentle application. |
| Pen Priming | Prime the pen on cardboard until it releases a smooth, consistent dot. | Prevents the need for excessive pressure and avoids paint globs. |
| Application | Dab a small dot on the thorax with a slow, deliberate touch. | Protects the queen from injury and prevents rejection by the colony. |
| Common Pitfall | Avoid marking the head, abdomen, or antennae; use only the thorax. | Prevents impeding the queen's senses, breathing, or egg-laying. |
Ready to perfect your queen marking technique with professional-grade equipment?
For commercial apiaries and beekeeping equipment distributors, efficient and safe hive management is paramount. HONESTBEE supplies the durable, high-quality tools you rely on for precise operations like queen marking. Our wholesale-focused operations ensure you get the equipment you need to protect your valuable queens and optimize your productivity.
Contact HONESTBEE today to discuss your supply needs and elevate your beekeeping practice.
Visual Guide
Related Products
- Durable Galvanized Steel Spring Queen Bee Cage
- Portable Queen Bee Incubator with 12V Car Adapter for Safe Transport
- Professional Queen Bee Introduction and Transport Cage
- Premium Wood Framed Metal Wire Queen Bee Excluder
- Heavy Duty Stainless Steel Queen Bee Catcher Clip
People Also Ask
- How long does it typically take for bees to adjust to a new queen? Master the 2-7 Day Requeening Window
- When and how should a beekeeper verify that the queen bee has been released? Ensure Colony Success
- What are the advantages and disadvantages of introducing a queen bee by embedding the cage? Boost Your Queen Acceptance
- What materials are required to install a queen bee's cage into a hive? Essential Tools for Successful Queen Integration
- Why are specialized queen bee cages used for the banking of mated queen bees? Maximize Commercial Apiary Storage Efficiency