Demolding beeswax candles seems simple—until cracks form or half the wax sticks to the mold. The difference between flawless release and frustration lies in understanding cooling dynamics and adapting to variables like mold materials. This guide combines thermal science with practical tests to ensure consistent, damage-free results.
Beeswax Candle Cooling Mechanics
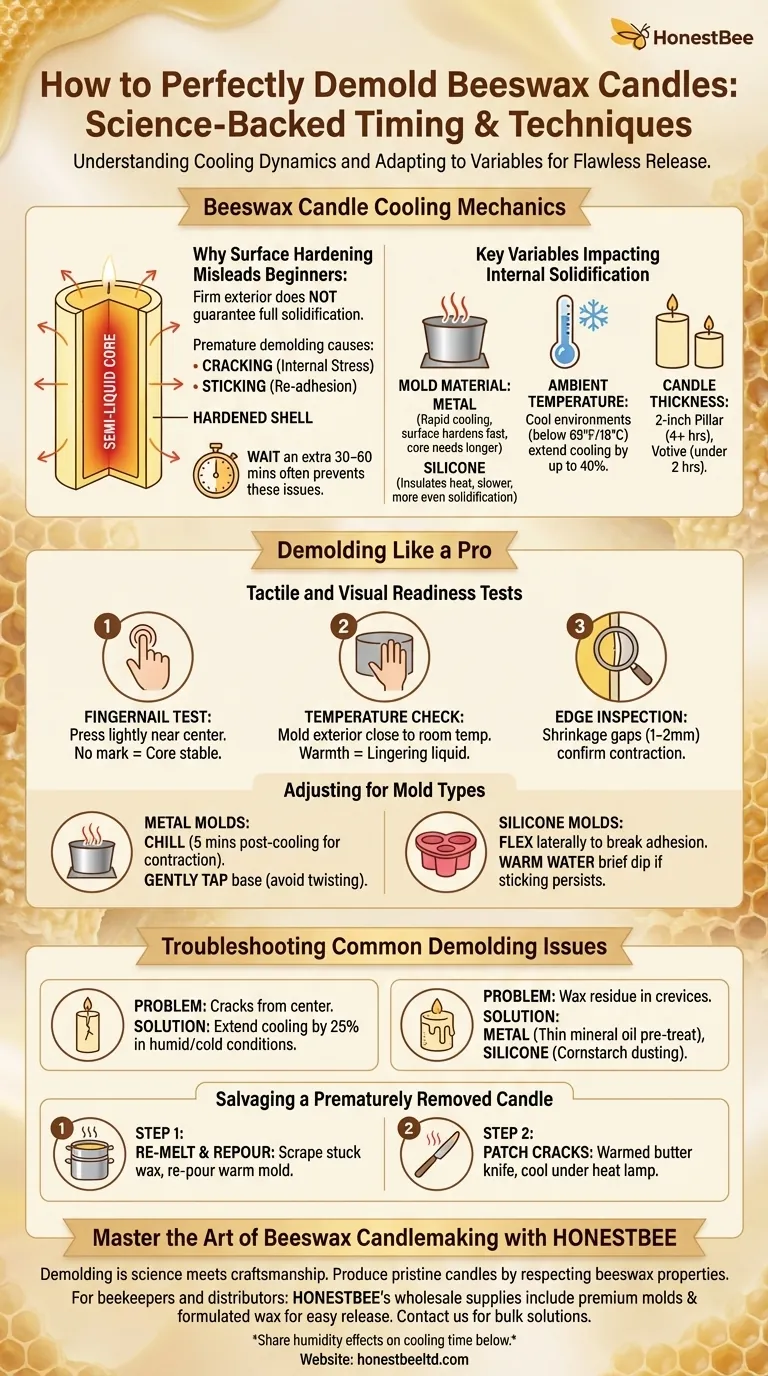
Why Surface Hardening Misleads Beginners
A firm exterior doesn’t guarantee full solidification. Beeswax cools from the outside in, creating a deceptively rigid shell while the core remains semi-liquid. Premature demolding during this phase causes:
- Cracking from internal stress as the unsupported core contracts
- Sticking where molten wax re-adheres to mold walls
Research shows beeswax’s cooling rate slows significantly after the initial phase—waiting an extra 30–60 minutes often prevents these issues.
Key Variables Impacting Internal Solidification
-
Mold Material
- Metal: Conducts heat rapidly, speeding surface hardening but requiring longer for core stability.
- Silicone: Insulates heat, leading to slower but more even solidification.
-
Ambient Temperature
Cool environments (below 65°F/18°C) extend cooling times by up to 40%. -
Candle Thickness
A 2-inch-diameter pillar may need 4+ hours to fully set, while votives solidify in under 2 hours.
Demolding Like a Pro
Tactile and Visual Readiness Tests
-
Fingernail Test
Press a fingernail lightly into the wax near the mold’s center. If it leaves no mark, the core is stable. -
Temperature Check
The mold’s exterior should feel close to room temperature—warmth indicates lingering liquid wax. -
Edge Inspection
Shrinkage gaps (1–2mm) between wax and mold confirm contraction is complete.
Adjusting for Mold Types
-
Metal Molds:
- Chill in the freezer for 5 minutes post-cooling to contract the metal slightly, easing release.
- Avoid twisting; instead, gently tap the base on a padded surface.
-
Silicone Molds:
- Flex the mold laterally to break the wax’s adhesion before pushing from the bottom.
- If sticking persists, briefly place the mold in warm (not hot) water to soften the wax surface.
Troubleshooting Common Demolding Issues
Preventing Cracks and Sticking
-
Problem: Cracks radiating from the center.
Solution: Extend cooling time by 25% in humid or cold conditions. -
Problem: Wax residue clinging to mold crevices.
Solution: Pre-treat metal molds with a thin mineral oil layer; silicone molds benefit from cornstarch dusting.
Salvaging a Prematurely Removed Candle
If demolded too early:
-
Re-melt and Repour:
Scrape stuck wax back into a double boiler, then re-pour while the mold is warm to prevent seams. -
Patch Cracks:
Use a warmed butter knife to smooth fissures, then cool under a heat lamp for even hardening.
Master the Art of Beeswax Candlemaking with HONESTBEE
Demolding is where science meets craftsmanship. By respecting beeswax’s unique properties and adapting to your tools, you’ll produce pristine candles every time.
For beekeepers and distributors: HONESTBEE’s wholesale beekeeping supplies include premium molds and wax formulated for easy release. Elevate your production with equipment designed for efficiency—contact us to explore bulk solutions tailored to your apiary’s needs.
Have you noticed how ambient humidity affects your candles’ cooling time? Share your observations below.
Visual Guide
Related Products
- 3D Square Honeycomb Pillar Silicone Candle Molds for Making Beeswax Candles
- Beeswax Melter for Candle Making Honey Bee Wax Melter
- 3D Beehive Silicone Skep Wax Candle Molds for Candles
- Bee Floral Relief Silicone Mold for Artisan Soap Candle Making
- Colorful Silicone Beeswax Foundation Mold Mould for Beekeeping