To clean a honey press, you must tackle two different substances: sticky honey and hardened beeswax. The most effective method involves a multi-stage process: first, use a powerful spray of water to remove loose honey, then use boiling water to soften and remove the compressed wax puck, and finally, wash all components with warm, soapy water for a food-safe clean.
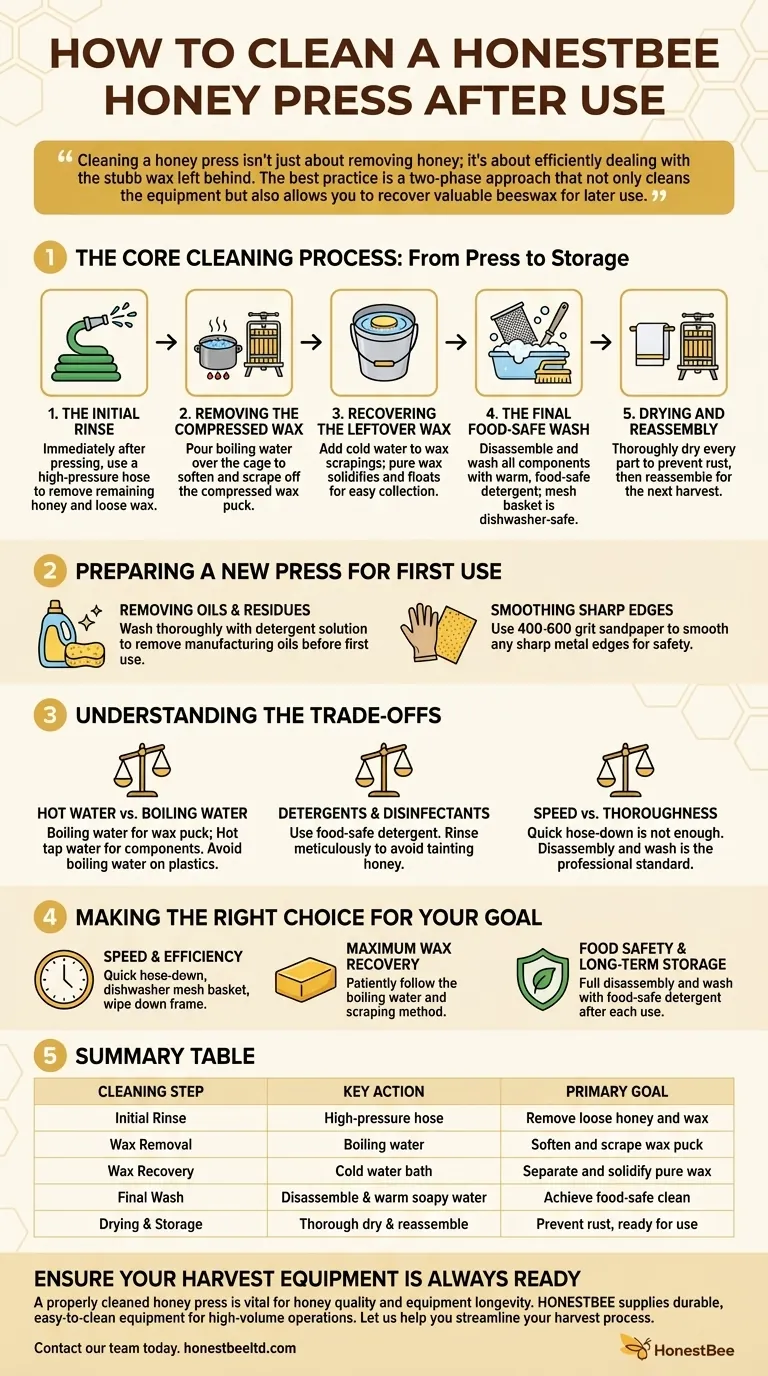
Cleaning a honey press isn't just about removing honey; it's about efficiently dealing with the stubborn wax left behind. The best practice is a two-phase approach that not only cleans the equipment but also allows you to recover valuable beeswax for later use.
The Core Cleaning Process: From Press to Storage
A proper cleaning workflow ensures your press is ready and sanitary for your next harvest. It moves from removing the bulk of the material to a final, detailed wash.
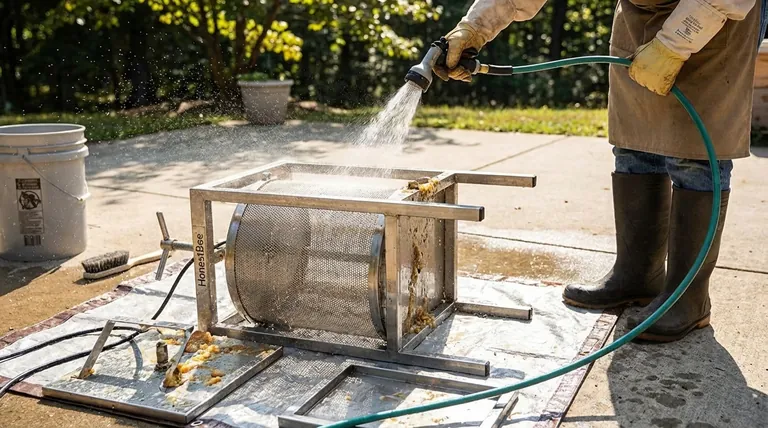
Step 1: The Initial Rinse
Immediately after pressing, give the equipment a preliminary clean. Take the press outside and use a hose, preferably with a jet or high-pressure setting, to blast away as much of the remaining honey and loose wax particles as possible.
This first pass dramatically reduces the amount of sticky residue you have to deal with in the next stages.
Step 2: Removing the Compressed Wax
The main challenge is the "puck" of compressed wax and comb left inside the press cage. Boiling water is the key to removing this effectively.
Unwind the press and carefully remove the steel cage containing the wax. Place it in a large, heat-proof bucket.
Pour boiling water directly over the cage. The intense heat will immediately soften the wax, causing it to release its grip on the metal. You can then easily scrape the bulk of the softened wax off the cage.
Step 3: Recovering the Leftover Wax
The wax you scrape off is a valuable byproduct. To separate it from any remaining honey or debris, add cold water to the bucket containing the wax scrapings.
The cold water will cause the pure wax to solidify and float to the top, while honey and other impurities sink. You can then easily skim the hardened wax disc off the water, rinse it, and set it aside for later rendering.
Step 4: The Final Food-Safe Wash
With the bulk of the wax removed, focus on a final, thorough cleaning. Honey presses are designed to be disassembled. Take it apart to ensure you can clean every surface.
Wash all components, especially the mesh basket and pressing plate, with warm water and a food-safe detergent. For an even deeper clean, the stainless steel mesh basket can often be run through a dishwasher.
Step 5: Drying and Reassembly
Thoroughly dry every part of the press with a clean towel. Leaving water on metal components can lead to rust or corrosion over time.
Once completely dry, reassemble the press. This ensures no parts are lost and that the equipment is ready for immediate use during your next harvest.
Preparing a New Press for First Use
Before you ever use a new honey press, it requires an initial cleaning to remove manufacturing residues.
Removing Oils and Residues
New equipment often has a coating of machine oil, welding residue, or metal filings. Wash the entire press thoroughly with a detergent solution and warm water to remove these contaminants before it ever touches your honey.
Smoothing Sharp Edges
As a quality-of-life improvement, inspect the press for any sharp metal edges left over from the manufacturing process. Wearing gloves, you can use 400 to 600-grit sandpaper to smooth these areas, making the equipment safer and easier to handle.
Understanding the Trade-offs
Choosing the right cleaning method involves balancing speed, thoroughness, and safety.
Hot Water vs. Boiling Water
Boiling water is essential for softening the compressed wax puck. However, for washing the individual components, very hot tap water combined with detergent is sufficient and safer to handle. Be cautious if your press has any plastic parts, as boiling water could warp them.
Detergents and Disinfectants
Always use a food-safe detergent and rinse meticulously. Any leftover soap can taint your next honey harvest. If you choose to use a disinfectant, opt for a natural, food-grade option and, again, rinse thoroughly.
Speed vs. Thoroughness
A quick hose-down is better than nothing, but it won't remove the wax and may not be sanitary for long-term storage. Taking the time to disassemble and properly wash the press is the professional standard that protects your equipment and your product.
Making the Right Choice for Your Goal
Your cleaning strategy can be adapted based on your immediate priority.
- If your primary focus is speed and efficiency: Use a hose for a quick initial rinse, then place the mesh basket directly in the dishwasher and wipe down the frame.
- If your primary focus is maximum wax recovery: Patiently follow the boiling water and scraping method to ensure you save as much clean wax as possible.
- If your primary focus is food safety and long-term storage: Always perform a full disassembly and wash with a food-safe detergent after each use.
By treating cleaning as the final, crucial step of your harvest, you guarantee the longevity of your equipment and the purity of your next batch.
Summary Table:
| Cleaning Step | Key Action | Primary Goal |
|---|---|---|
| Initial Rinse | Use a high-pressure hose | Remove loose honey and wax |
| Wax Removal | Apply boiling water to the cage | Soften and scrape the compressed wax puck |
| Wax Recovery | Add cold water to the bucket | Separate and solidify pure wax for reuse |
| Final Wash | Disassemble and wash with warm, soapy water | Achieve a food-safe clean on all components |
| Drying & Storage | Thoroughly dry and reassemble | Prevent rust and prepare for next use |
Ensure Your Harvest Equipment is Always Ready
A properly cleaned honey press is vital for maintaining the quality of your honey and the longevity of your investment. At HONESTBEE, we supply commercial apiaries and distributors with durable, easy-to-clean beekeeping equipment designed for high-volume operations.
Let us help you streamline your harvest process with professional-grade supplies. Contact our team today to discuss your wholesale needs and discover how our equipment can enhance your efficiency and protect your product.
Visual Guide
Related Products
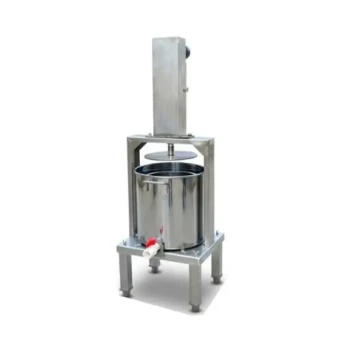
- Stainless Steel Manual Honey Press with Guard for Pressing Honey and Wax
- Stainless Steel Honey Press Wax Press with Tank
- Easy Use Manual Stainless Steel Honey Press for Honey Comb
- Electric Honey Press Machine for Squeezing Honey Comb Press Equipment
- 10L Stainless Steel Electric Honey Press Machine
People Also Ask
- What is a honey press and what is it used for? A Guide to Simple Honey Extraction
- What is the procedure for extracting honey using a honey press? A Guide to Maximum Yield
- What materials are used to construct the honey press? Choose Durable, Food-Grade Solutions for Your Apiary
- For which type of beekeeping operations is this honey press most suitable? Efficient Solutions for High-Volume Apiaries
- What are the potential drawbacks of honey produced using a honey press? Navigate Quality & Market Challenges