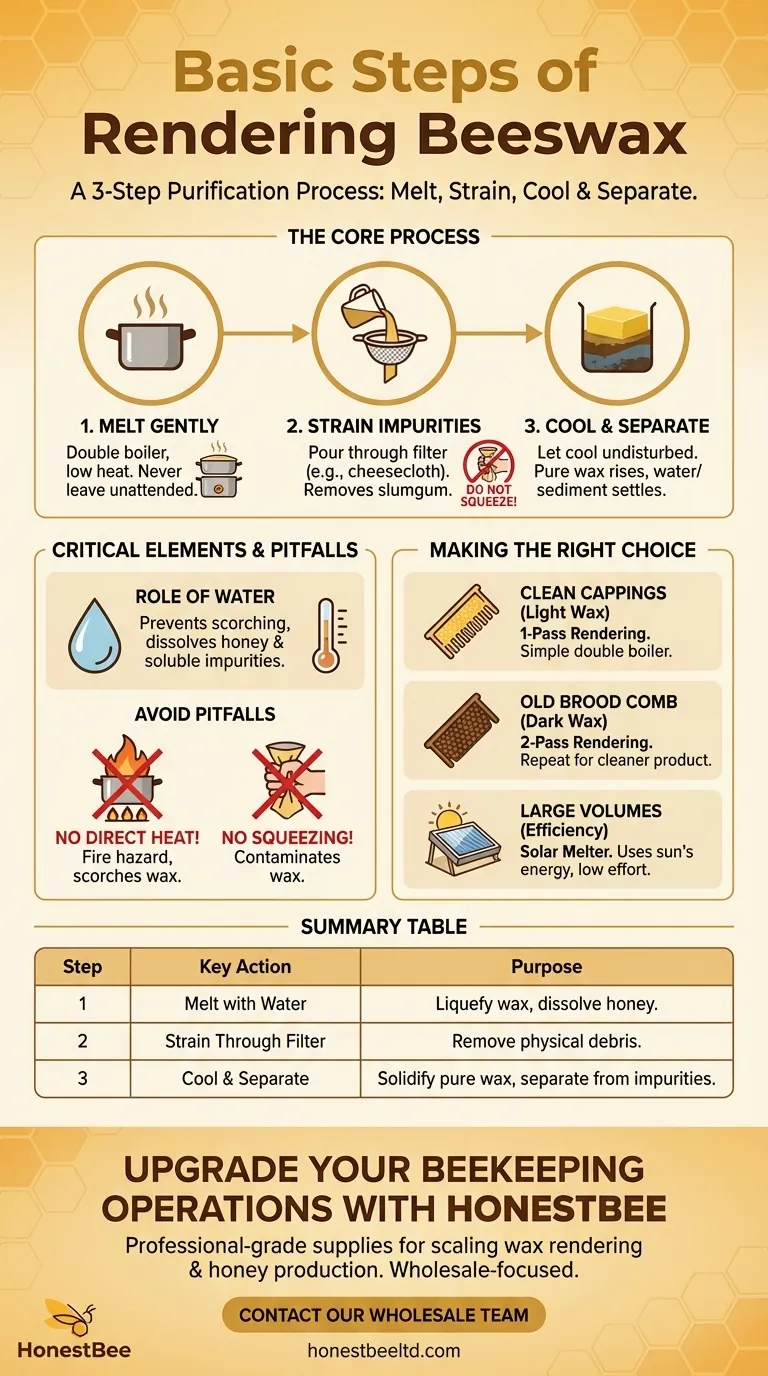
At its core, rendering beeswax is a simple three-step purification process. You melt the raw comb and cappings, strain the liquid to remove physical debris, and allow the purified wax to cool and solidify. This process effectively separates the valuable wax from residual honey, pollen, and other hive materials.
The primary goal of rendering is not simply to melt wax, but to separate it from water-soluble impurities like honey and non-soluble debris like cocoons. Understanding this principle of separation is the key to producing clean, high-quality beeswax.

The Goal: From Raw Comb to Pure Wax
Before beginning, it is crucial to understand what you are working with. The quality of your raw material directly impacts the intensity of the rendering process required.
Understanding Your Raw Material
Raw beeswax is collected from various sources within the hive, including honeycomb cappings, burr comb, or old brood comb. These sources are never pure wax; they are mixed with residual honey, pollen, propolis, and the silken cocoons left behind by developing bees.
The Critical Role of Water
Water is your most important tool in rendering. Adding water to your raw comb before heating accomplishes two things: it prevents the wax from scorching by regulating the temperature, and it dissolves water-soluble impurities like honey, allowing them to separate easily.
The Rendering Process, Step-by-Step
The method for rendering can range from a simple pot on the stove to a dedicated solar melter, but the core principles remain the same. The double-boiler method is the safest and most recommended approach for beginners.
Step 1: Gently Melt the Comb
Place your raw comb and an equal or greater amount of water into a dedicated pot (one you don't use for food). Place this pot inside a larger pot containing water, creating a double boiler.
Heat the setup over low to medium heat. Never leave melting wax unattended. The goal is to melt the wax slowly and gently, not to boil it.
Step 2: Strain the Impurities
Once the wax is fully melted, prepare to strain it. Pour the hot liquid mixture through a filter into a clean, heat-proof collection container (like a plastic bucket or old bread pan).
Good filter materials include multiple layers of cheesecloth, a piece of an old t-shirt, or a fine-mesh strainer. This first pass removes the largest pieces of debris, often called "slumgum."
Step 3: Cool, Separate, and Harden
Allow the collection container to cool completely undisturbed for several hours or overnight. As it cools, the magic happens: the lighter, pure beeswax will rise to the top and solidify into a clean disc.
The dirty, honey-infused water and finer sediment will settle at the bottom. Once the wax is fully hardened, you can easily pop the block out of the container and scrape any remaining sludge from its underside.
Common Pitfalls to Avoid
Success in rendering often comes from avoiding common mistakes. Overheating and improper filtering are the two most frequent issues.
The Danger of Direct Heat
Beeswax is flammable and has a relatively low flash point. Placing a pot of wax directly on a heat source is a significant fire hazard. It also risks scorching the wax, which permanently darkens its color and imparts a burnt smell. Always use a double boiler or a temperature-controlled device.
The Urge to Squeeze the Filter
When straining, you will be tempted to squeeze the filter cloth to get every last drop of wax out. Resist this urge. Squeezing forces finer particles of debris through the filter, contaminating the wax you just cleaned and often requiring you to repeat the entire process. Let it drip through naturally.
When One Pass Isn't Enough
For very dirty material like old brood comb, a single rendering may not be enough. The resulting wax block might still look dark or have impurities. Simply break up this block and repeat the process—melt it again with clean water and strain it through a fresh filter for a much cleaner final product.
Making the Right Choice for Your Goal
Your approach should match the quality of your raw material and your desired outcome.
- If your primary focus is processing clean honey cappings: A simple, single-pass rendering using a double boiler and cheesecloth is all you need for beautiful, light-colored wax.
- If your primary focus is salvaging old, dark brood comb: Plan for a two-stage rendering process to effectively remove the high concentration of cocoons and propolis staining.
- If your primary focus is hands-off efficiency for large volumes: Investing in or building a solar melter is an excellent choice, as it uses the sun's gentle energy to melt and separate wax over time with minimal effort.
With patience and an understanding of the process, you can reliably transform any collection of raw hive materials into clean, usable beeswax.
Summary Table:
| Step | Key Action | Purpose |
|---|---|---|
| 1 | Gently Melt with Water | Liquefy wax and dissolve honey/soluble impurities |
| 2 | Strain Through Filter | Remove physical debris (slumgum) |
| 3 | Cool and Separate | Allow pure wax to solidify and separate from water/sediment |
Upgrade Your Beekeeping Operations with HONESTBEE
Are you a commercial apiary or beekeeping equipment distributor looking to scale your wax rendering and honey production? HONESTBEE supplies professional-grade beekeeping supplies and equipment through wholesale-focused operations. We provide the durable tools you need for efficient, large-scale wax processing—from high-capacity melters to industrial straining systems.
Let us help you increase your yield and product quality. Contact our wholesale team today to discuss your specific needs and request a catalog.
Visual Guide
Related Products
- Beeswax Foundation Sheets Beehive Foundation for Wholesale
- Colorful Silicone Beeswax Foundation Mold Mould for Beekeeping
- Economy Manual Beeswax Embossing Mill Wax Foundation Machine Roller
- Beeswax Melter for Candle Making Honey Bee Wax Melter
- Electric Beeswax Flat Sheet Machine with Operating Tray for Wax Processing
People Also Ask
- What are beeswax foundation sheets used for? A Guide to Efficient Hive Management
- How do beeswax foundation sheets benefit modern hives? Boost Honey Yield and Optimize Colony Efficiency
- What are wax sheets made of? A Guide to Pure Beeswax Foundation for Healthy Hives
- Why is the regular exchange and replacement of beeswax foundations encouraged? Boost Honey Yield & Hive Biosafety
- What are the technical advantages of beeswax foundations and feeding tools? Optimize Your Bee Breeding Phase