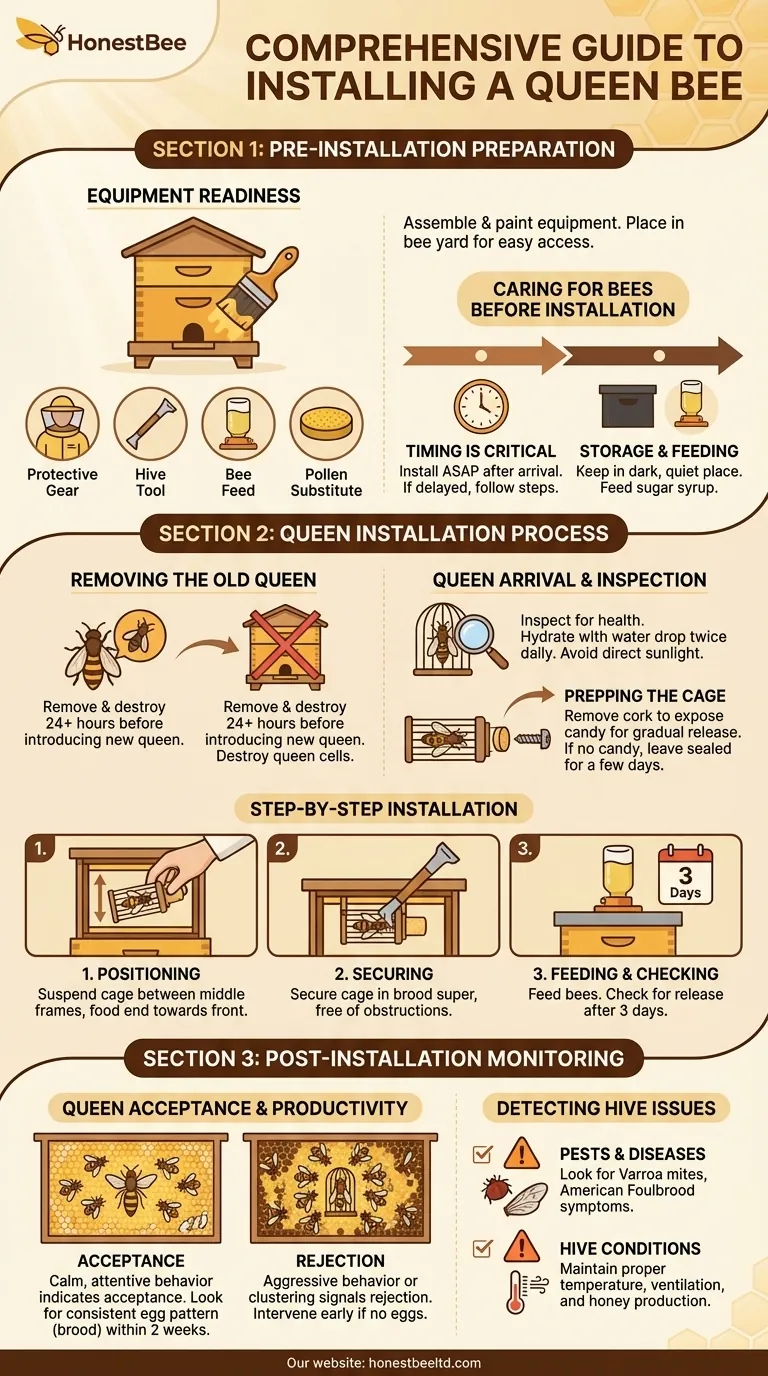
Pre-Installation Preparation
Equipment Readiness
Before your bees arrive, it’s crucial to ensure all equipment is fully prepared. Start by assembling and painting your bee queen grafting equipment, as this will help protect the materials from weathering and extend their lifespan. Place all assembled equipment in the bee yard, ensuring it’s easily accessible for installation day.
Here’s a checklist of essential items to have ready:
- Protective Gear: A bee suit, gloves, and a veil to ensure safety during handling.
- Hive Tool: For prying apart hive components and scraping off excess wax or propolis.
- Bee Feed: Sugar syrup to provide immediate nourishment.
- Pollen Substitute: To support colony health, especially if natural pollen sources are scarce.
Having everything prepared in advance minimizes stress for both you and the bees during the installation process.
Caring for Bees Before Installation
Timing is critical when it comes to installing your bees. Aim to install them as soon as possible after arrival to reduce stress and ensure their well-being. If transporting the bees, ensure their container is securely strapped and avoid covering it completely, as this can lead to overheating.
If installation is delayed, follow these steps to care for the bees:
- Storage: Keep the bees in a dark, quiet place to calm them.
- Feeding: Provide them with a sugar syrup to sustain them until installation.
Proper care during this pre-installation phase sets the stage for a successful transition into their new hive.
Queen Installation Process
Removing the Old Queen
When replacing an existing queen, it’s crucial to remove and destroy the old queen at least 24 hours before introducing the new one. This step ensures the colony has time to adjust to the absence of their leader and reduces the likelihood of rejection. Additionally, destroy any queen cells present in the hive to prevent the emergence of rival queens.
The old queen can be removed by taking her several meters away from the hive or by placing her in a freezer, where she will gradually fall asleep and die. This method is both humane and effective, allowing for a smooth transition to the new queen.
Queen Arrival and Inspection
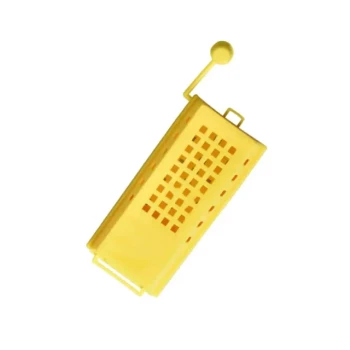
Upon the arrival of the new queen, carefully inspect her to ensure she is healthy and active. If she’s not installed immediately, place a small drop of water on the screen of her cage twice a day to keep her hydrated. Avoid exposing her to direct sunlight, as this can stress or harm her.
If the queen cage has a cork covering a candy plug, use a wood screw or sharp tool to remove the cork and expose the candy. This allows the worker bees to gradually release the queen by eating through the candy. If there’s no candy plug, leave the sealed cage in the hive for a few days before removing the cork. This gives the colony time to acclimate to her pheromones, increasing the chances of acceptance.
Step-by-Step Installation
-
Positioning the Cage: Attach and suspend the queen cage between the middle two frames of the hive. Ensure the cage sits low enough so that placing an inner cover or another super over it doesn’t interfere with its placement. Point the food end towards the front of the hive for easier inspection.
-
Securing the Cage: Identify where the majority of the brood is located within the brood super box. Pull out the desired frame and secure the cage into position. If necessary, use a hive tool to clear some drawn comb to ensure the cage is embedded securely. Make sure the exit hole on the outside of the cage is free of obstructions.
-
Feeding the Bees: After placing the inner and outer covers over the hive, feed the bees to encourage their activity and acceptance of the new queen. Return after three days to check if the queen has been released from the cage.
This method ensures the queen is positioned in the right area of the hive, allows for quick insertion, and makes it easy to monitor her release. Proper installation is key to the success of bee queen grafting and the overall health of the colony.
Post-Installation Monitoring
Queen Acceptance and Productivity
After the bee queen grafting process, it’s crucial to monitor the hive to ensure the new queen is accepted and productive. Observe the bees’ behavior around the queen cage. Worker bees should show calm and attentive behavior, indicating acceptance. Aggressive behavior or clustering around the cage may signal rejection.
Within two weeks, check for egg-laying to gauge the queen’s productivity. A healthy queen will lay eggs in a consistent pattern, filling the comb with brood. If no eggs are observed, it may indicate a problem with the queen or her acceptance by the colony. Early detection allows for timely intervention, such as replacing the queen if necessary.
Detecting Hive Issues
Regular hive inspections are essential to identify and address potential issues early. Common problems include infestations like Varroa mites or diseases such as American Foulbrood. During inspections, look for signs of these issues, such as deformed wings, unusual brood patterns, or foul odors.
Monitoring hive conditions is equally important. Ensure the hive maintains proper temperature and ventilation, as these factors directly impact colony health. A well-ventilated hive prevents moisture buildup, which can lead to mold or disease. Regular checks also help confirm that the bees are utilizing the hive space effectively, especially after adding a super. Observing bee activity and honey production can provide insights into the colony’s overall health and productivity.
Visual Guide
Related Products
- Durable Galvanized Steel Spring Queen Bee Cage
- Portable Queen Bee Incubator with 12V Car Adapter for Safe Transport
- Professional Queen Bee Introduction and Transport Cage
- Heavy Duty Stainless Steel Queen Bee Catcher Clip
- Queen Bee Catcher Plastic Bee Marker Bottle with Piston Marking Tube
Related Articles
- The Diplomatic Interface: Why Queen Cage Maintenance is a Study in Risk Management
- How Beekeepers Can Ensure Successful Queen Introduction Through Behavioral Science
- The Signal and the Swarm: How a Single Colored Dot Governs a 50,000-Bee System
- How to Introduce a Queen Bee Successfully Using Queen Cages: A Beekeeper’s Guide
- Engineering Acceptance: Why the JZ-BZ Queen Cage is More Than Just a Box