In almost all climates, yes. Winterizing your beehive is a critical step for ensuring the colony's survival. The process involves much more than just keeping bees warm; it's a strategic approach to managing food, controlling moisture, and providing protection from the elements.
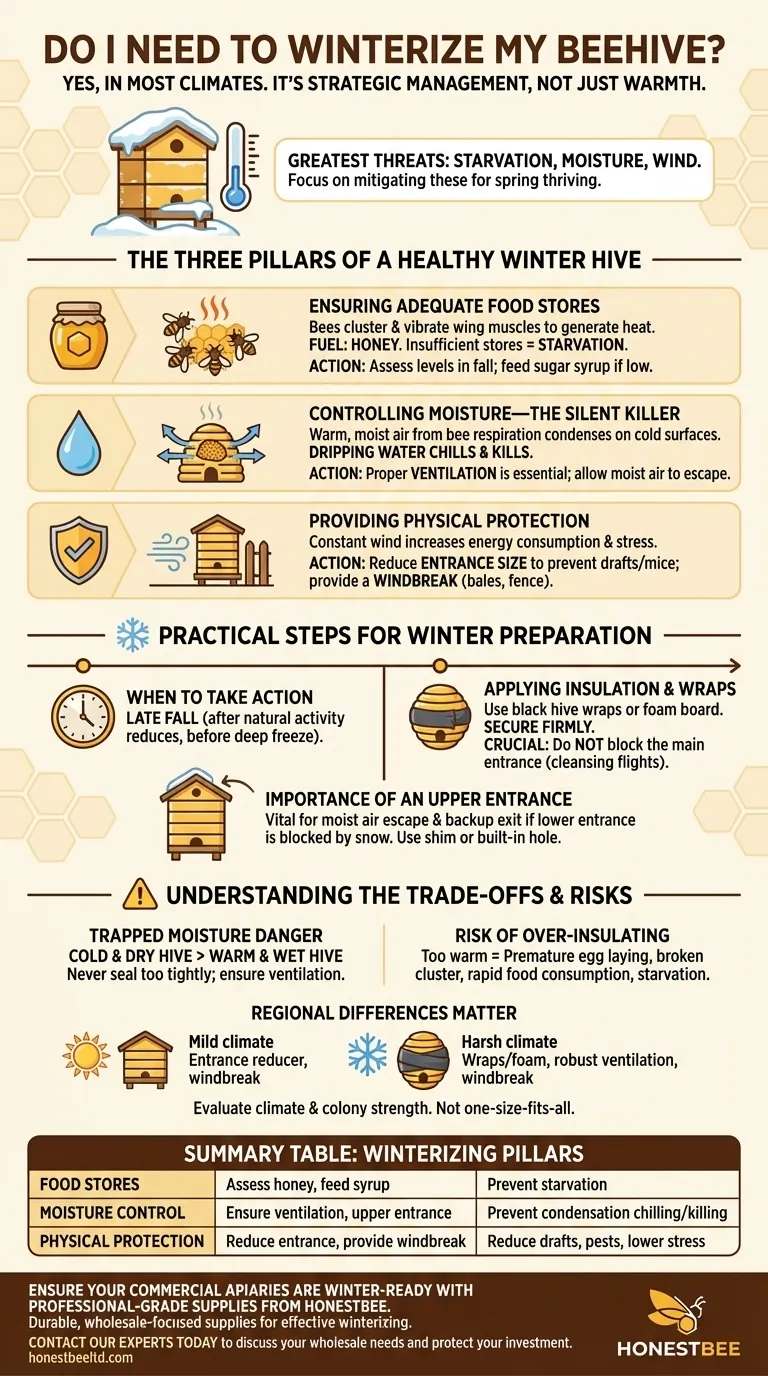
The greatest threats to a beehive in winter are not the cold itself, but rather starvation, moisture, and wind. Your winterizing strategy should focus on mitigating these three factors to give your colony the best possible chance of thriving into the spring.
The Three Pillars of a Healthy Winter Hive
A successful winterizing plan addresses the core challenges bees face. Cold temperatures are manageable for a healthy, clustered colony, but only if their environment is properly prepared.
Pillar 1: Ensuring Adequate Food Stores
Bees do not heat the entire hive. Instead, they form a tight cluster and generate heat by vibrating their wing muscles, which consumes a significant amount of energy.
Their fuel for this process is honey. A colony with insufficient honey stores will starve long before it freezes. In the fall, you should assess honey levels and feed the bees with sugar syrup if their reserves are low.
Pillar 2: Controlling Moisture—The Silent Killer
As bees consume honey and respire, they release warm, moist air. When this air hits the cold inner surfaces of the hive, it condenses into water.
This condensation can drip down onto the cluster, chilling and killing the bees. Trapped moisture is a far greater threat than cold air. Proper ventilation is essential to allow this moist air to escape.
Pillar 3: Providing Physical Protection
While bees can handle the cold, constant exposure to wind dramatically increases their energy consumption and stress. Physical barriers reduce the impact of harsh weather.
This includes reducing the size of the hive entrance to prevent drafts and deter mice, as well as providing a windbreak using bales of hay, a fence, or other structures.
Practical Steps for Winter Preparation
The goal is to prepare the hive before the worst of the weather arrives. Acting too early or too late can be counterproductive.
When to Take Action
The best time to winterize is in late fall. You should wait until after the bees have naturally reduced their activity and formed their winter cluster, but before the first deep freeze or significant snowfall.
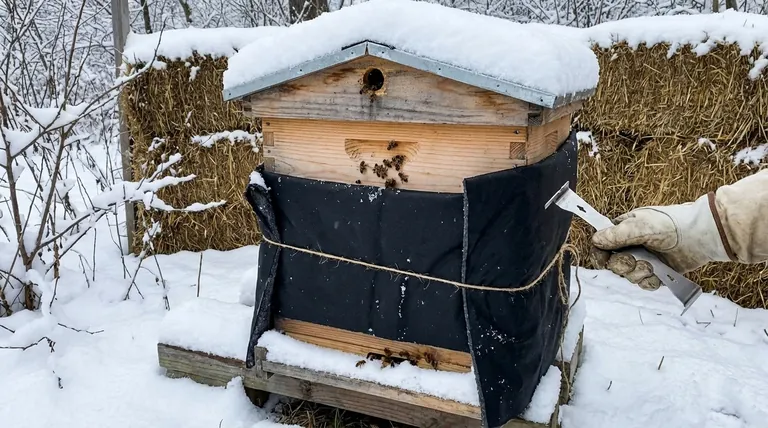
Applying Insulation and Wraps
Insulation helps the hive retain a small amount of heat, reducing the energy bees must expend. Common methods include using black hive wraps or foam insulation boards.
When applying any wrap or insulation, secure it firmly with tape or staples. Crucially, ensure the main entrance is not blocked. Bees need to be able to exit for "cleansing flights" on warmer days.
The Importance of an Upper Entrance
Many hive wraps come with a small upper entrance hole, and it is wise to create one if yours does not.
This small opening is vital for two reasons: it provides a primary escape route for moist air, and it gives bees an exit if the lower entrance becomes blocked by snow and ice. You can also create this ventilation gap by placing a shim or small sticks under the inner cover.
Understanding the Trade-offs and Risks
An improper winterizing strategy can do more harm than good. Objectivity is key to avoiding common mistakes.
The Danger of Trapped Moisture
The most common error is sealing a hive too tightly. Remember, a cold and dry hive is better than a warm and wet hive. Never apply wraps or insulation in a way that blocks ventilation paths.
The Risk of Over-Insulating
Making the hive too warm can signal to the queen that it's time to start laying eggs prematurely. This can cause the colony to break its cluster and consume its winter food stores far too quickly, leading to starvation.
Regional Differences Matter
Winterizing is not a one-size-fits-all process. A hive in a mild climate may only need an entrance reducer and a windbreak. A hive in a northern region with heavy snow and high winds will require a more comprehensive approach with full insulation.
Making the Right Choice for Your Colony
Your primary goal dictates your specific actions. Evaluate your climate and the strength of your colony to decide on the appropriate level of intervention.
- If your primary focus is survival in a harsh climate: You will need a multi-layered approach using wraps or foam board, a dedicated windbreak, and a robust plan for moisture ventilation like a quilt box or upper entrance.
- If your primary focus is supporting a hive in a moderate climate: Concentrate on the essentials. Ensure ample food stores, reduce the main entrance, and position the hive out of the prevailing wind.
- If your primary focus is promoting overall colony health: Prioritize moisture control above all else. A dry hive with enough food can survive surprisingly cold temperatures.
By focusing on food, moisture, and wind, you provide your bees with the stable environment they need to endure the winter and emerge strong in the spring.
Summary Table:
| Winterizing Pillar | Key Action | Purpose |
|---|---|---|
| Food Stores | Assess honey levels; feed sugar syrup if needed | Prevent starvation during the winter cluster |
| Moisture Control | Ensure proper ventilation; create an upper entrance | Prevent condensation from chilling/killing bees |
| Physical Protection | Reduce entrance size; provide a windbreak | Reduce drafts, deter pests, and lower bee stress |
Ensure your commercial apiaries are winter-ready with professional-grade supplies from HONESTBEE. We provide beekeeping equipment distributors and commercial apiaries with the durable, wholesale-focused supplies needed for effective winterizing—from ventilation tools to hive wraps. Don't let winter losses impact your operation. Contact our experts today to discuss your wholesale needs and protect your investment.
Visual Guide
Related Products
- Stainless Steel Round Beehive Air Vents for Ventilation
- Wholesales Dadant Size Wooden Bee Hives for Beekeeping
- Metal Hive Feet Bee Hive Stand for Ant Protection
- Metal Bee Hive Stand Bee Box Stand for Beekeeping
- Wooden Bee Hive Frames for Beekeeping and Wholesale
People Also Ask
- Why is proper ventilation important in a beehive? Prevent Mold, Regulate Temperature, and Boost Colony Health
- What happens if there is no ventilation at the top of a hive in winter? Prevent Deadly Condensation and Colony Loss
- How can a beekeeper provide proper ventilation for a beehive throughout the year? Seasonal Strategies for Bee Health
- How can ventilation be added to a beehive without using an inner cover? Simple, Effective Solutions for Healthy Hives
- How does ventilation affect colony health, and how should it be managed seasonally? A Guide to Preventing Moisture & Overheating