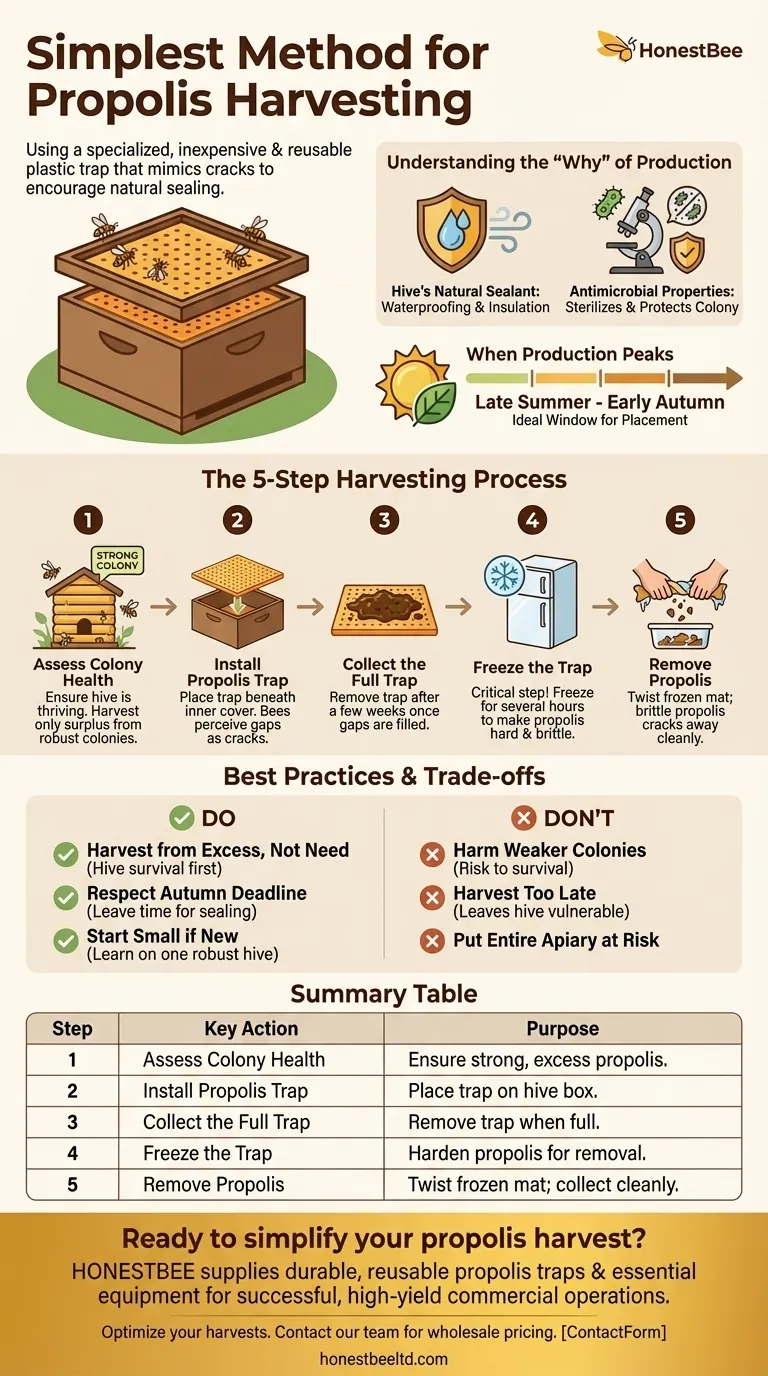
The simplest method for harvesting propolis involves using a specialized propolis trap, which is an inexpensive and reusable plastic mat. These traps are designed with small grooves or gaps that mimic unwanted cracks in the hive, encouraging the bees' natural instinct to seal them. This process is most effective when done in late summer or early autumn, as this is when bees peak their propolis production in preparation for winter.
The core principle is not simply to extract propolis, but to do so sustainably. A successful harvest relies on using the right tool at the right time and, most importantly, ensuring the colony remains healthy and well-protected for the coming winter.
Understanding the "Why" of Propolis Production
Propolis is more than just a byproduct; it's a critical component of a hive's health and structural integrity. Understanding its purpose is key to harvesting it responsibly.
The Hive's Natural Sealant
Bees create propolis from plant resins to serve several functions. It acts as a waterproof sealant and a draft excluder, insulating the hive from the elements.
Crucially, propolis also has powerful antimicrobial and antibacterial properties, helping to sterilize the hive and protect the colony from disease.
When Production Peaks
Bees are most driven to seal cracks and drafts in late summer and early fall as they prepare the hive for the cold months ahead.
This natural behavior is what makes this period the ideal window for placing a propolis trap and achieving an effective harvest.
The Step-by-Step Harvesting Process
Using a propolis trap is a straightforward process that minimizes disruption to the hive and yields a clean product.
Step 1: Assess Your Colony's Health
Before you begin, ensure the hive is strong, healthy, and thriving. Propolis harvesting should only be done with colonies that are producing an excess amount.
A weaker hive needs all its resources, including its propolis, to survive.
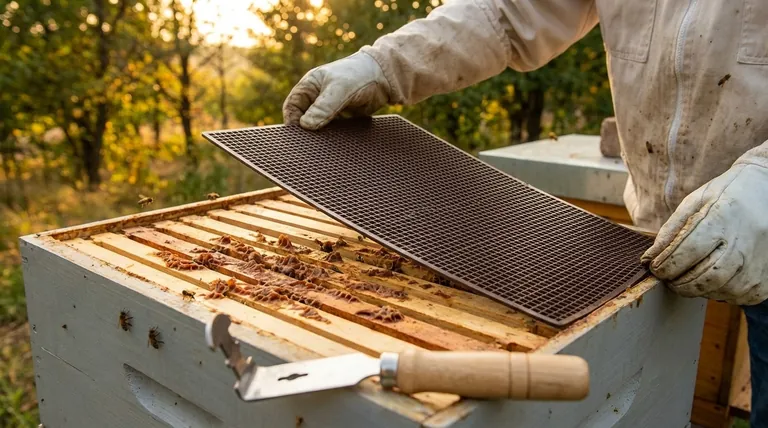
Step 2: Install the Propolis Trap
The plastic propolis trap or mat is placed directly on top of the uppermost hive box, just beneath the inner cover. The bees will perceive the gaps in the mat as cracks that need to be sealed.
Step 3: Collect the Full Trap
After a few weeks, the bees will have filled most of the gaps in the mat with propolis. Once it's sufficiently full, you can remove it from the hive.
Step 4: Freeze the Trap
This is the most critical step for easy collection. Place the entire propolis mat into a freezer for several hours.
Freezing makes the normally sticky propolis hard and brittle, allowing it to be separated from the plastic trap easily.
Step 5: Remove the Propolis
Once frozen, simply twist or flex the plastic mat. The brittle propolis will crack and break away from the trap, ready for collection and use.
Understanding the Trade-offs and Best Practices
Effective propolis collection is about working with the bees, not just taking from them. Adhering to best practices ensures the long-term health of your colony.
Harvest from Excess, Not from Need
The most fundamental rule is that the hive's needs come first. Propolis is essential for the bees' survival. Only harvest what is clearly surplus from a robust colony.
Respect the Autumn Deadline
While fall is the peak season for production, you must stop the harvest before winter truly sets in. Removing the trap too late can leave the bees without enough time to properly seal their hive against the cold.
This ensures the hive has the propolis it needs for waterproofing and insulation through the winter months.
Making the Right Choice for Your Goal
Your approach to harvesting should align with your primary objective as a beekeeper.
- If your primary focus is maximizing yield: Place traps on your strongest hives during the peak propolis production window of late summer and early autumn.
- If your primary focus is hive health: Harvest only from colonies with a clear surplus and be sure to remove traps well before the first hard frost, ensuring the colony is secure for winter.
- If you are a new beekeeper: Start with just one trap on your most robust hive to learn the process without putting your entire apiary at risk.
By aligning your harvesting efforts with the bees' natural rhythms, you can collect this valuable resource both responsibly and effectively.
Summary Table:
| Step | Key Action | Purpose |
|---|---|---|
| 1 | Assess Colony Health | Ensure the hive is strong and producing excess propolis. |
| 2 | Install Propolis Trap | Place a plastic trap mat on top of the hive box. |
| 3 | Collect the Full Trap | Remove the trap after bees fill the gaps (a few weeks). |
| 4 | Freeze the Trap | Harden the propolis for easy removal. |
| 5 | Remove Propolis | Twist the frozen mat; brittle propolis breaks away cleanly. |
Ready to simplify your propolis harvest?
As a commercial beekeeper or distributor, efficiency and hive health are paramount. HONESTBEE supplies the durable, reusable propolis traps and other essential beekeeping equipment you need for a successful, high-yield operation. Our wholesale-focused model ensures you get the reliable gear your business depends on.
Let us help you optimize your harvests. Contact our team today to discuss your equipment needs and wholesale pricing.
Visual Guide
Related Products
- 8 Frame and 10 Frame Propolis Trap Collector Screen for Propolis Collection
- Professional Bucket Style Wasp and Moth Pheromone Trap
- 30 cm Plastic Entrance Hole Bee Pollen Trap and Collector
- Removable Plastic Pollen Trap With Ventilated Tray for Bees Pollen Collector
- Compact Multi-Funnel Hanging Wasp Trap
People Also Ask
- What are the technical advantages of using specialized propolis collection screens? Maximize Purity and Efficiency
- What role does the measurement of propolis surface area play in evaluating the performance of a propolis collector?
- Why are professional propolis collectors and processing consumables necessary? Elevate Your Propolis Purity and Value
- What is the technical rationale for designing propolis collector holes parallel to hive frames? Boost Yield & Efficiency
- Why is a specific wooden frame required when installing a propolis screen? Optimize Your Propolis Harvest Efficiency