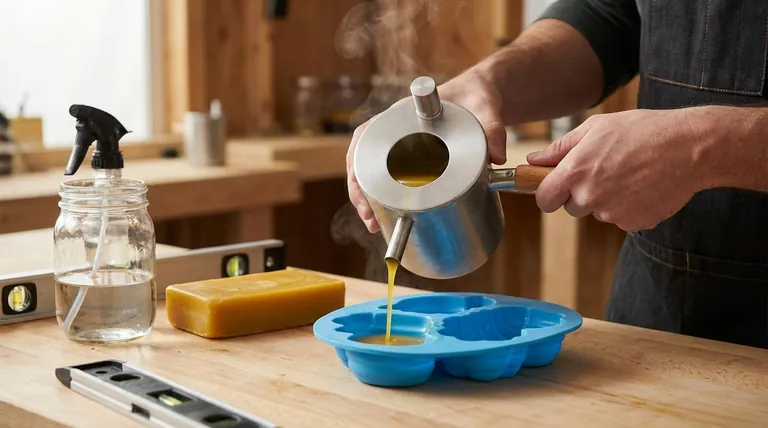
To pour melted beeswax, you need a steady hand and a prepared mold. Pour the liquid wax slowly and consistently into your mold, filling it to the top. The key is to avoid stopping and starting, which can create unwanted lines or layers in the final product.
The success of your project isn't determined by the pour alone. It depends on three critical stages: preparing the mold correctly, executing a controlled pour, and managing the cooling process to prevent defects like cracks or shrinkage.
The Foundation: Mold Preparation
Before you even think about pouring, proper preparation of your mold is the single most important step for achieving a clean, professional result.
Choosing the Right Mold
The material of your mold has a significant impact on how easily you can remove the cooled beeswax.
Flexible molds, like those made from silicone, are highly recommended. As beeswax cools, it shrinks slightly, and a flexible mold allows you to easily pop the final product out without damage.
Even simple recycled items like plastic takeout containers or yogurt cups can work well due to their slight flexibility.
Creating a Non-Stick Surface
Beeswax has a natural tendency to adhere to surfaces. To ensure a clean release, you must treat the mold first.
A simple and highly effective method is to lightly spray the inside of the mold with cool water just before pouring. This creates a micro-thin barrier of moisture that prevents the wax from sticking.
Ensuring a Level Base
Always place your mold on a completely level and stable surface before you begin. Pouring on an uneven surface will result in a lopsided or slanted final product, a flaw that is impossible to fix after the wax has set.
The Pour: A Study in Control
The physical act of pouring is about patience and consistency. Rushing this step is the primary cause of imperfections.
Maintain a Steady, Slow Pace
Use a pouring pot with a spout for maximum control. Pour the melted beeswax in a slow, steady stream.
Avoid pouring too quickly, which can introduce air bubbles. Most importantly, do not stop and start the pour, as this can create visible layer lines in the cooled wax.
Filling and Topping Off
Fill the mold to the very top. As beeswax begins to cool, it shrinks, and a small depression or "sinkhole" will often form in the center, especially around a candle wick.
Let the wax cool for 15-30 minutes until the sinkhole appears. Then, "top off" the mold by pouring a small amount of additional melted wax to fill the depression and create a perfectly flat surface.
Handling Two-Part Molds
For specific applications like patterned beeswax sheets, you may use a two-part silicone mold.
In this case, pour the wax into the bottom half of the mold. Immediately place the top half on, fitting it into place and gently pressing down to push the hot wax into all the crevices, ensuring a thin, even final product.
Understanding the Trade-offs: Heat and Speed
Managing the pouring process involves balancing variables. Misunderstanding these can lead to frustration.
The Problem with Pouring Too Hot
Pouring beeswax when it is excessively hot can cause the wax to shrink too dramatically as it cools. This can lead to significant cracks or very deep sinkholes that are difficult to fix.
The Risk of Pouring Too Cool
If your beeswax has already begun to solidify before you finish pouring, you will get a lumpy, uneven texture. It can also cause the wax to set before it has filled all the fine details of an intricate mold.
The Consequence of a Rushed Pour
Pouring too quickly traps air, creating bubbles that can mar the surface of your final piece. A fast, uncontrolled pour also makes it difficult to achieve a level surface.
Making the Right Choice for Your Project
Your specific goal determines which techniques are most critical.
- If your primary focus is making simple beeswax blocks or bars: Emphasize using flexible molds and the water-spray trick for the easiest possible release.
- If your primary focus is creating detailed candles: Your priority is a steady pour to capture detail and remembering to top off the mold to fix the sinkhole that will form around the wick.
- If your primary focus is making thin, patterned sheets: You must master the two-part mold technique of pouring and immediately pressing the top on to ensure an even thickness.
By focusing on careful preparation and a controlled cooling process, you can achieve a flawless finish every time.
Summary Table:
| Key Step | Critical Action | Why It Matters |
|---|---|---|
| Mold Prep | Use flexible silicone & spray with water. | Ensures easy, clean release of the final product. |
| The Pour | Maintain a slow, steady stream. | Prevents air bubbles and unsightly layer lines. |
| Cooling | Top off the mold after 15-30 minutes. | Corrects for shrinkage and creates a flat surface. |
Achieve Professional Results with the Right Equipment
Perfecting your beeswax pouring technique is just the beginning. Using high-quality, reliable supplies is what separates amateur projects from professional-grade products.
HONESTBEE is your trusted partner for all your beekeeping and crafting needs. We supply commercial apiaries and beekeeping equipment distributors with the durable, wholesale-focused tools required for success—from premium molds and pouring pots to bulk beeswax.
Ready to elevate your production? Contact our experts today to discuss your specific needs and discover how our products can help you create flawless beeswax products consistently.
Visual Guide

Related Products
- Beeswax Foundation Sheets Beehive Foundation for Wholesale
- Colorful Silicone Beeswax Foundation Mold Mould for Beekeeping
- Economy Manual Beeswax Embossing Mill Wax Foundation Machine Roller
- Beeswax Melter for Candle Making Honey Bee Wax Melter
- Electric Beeswax Flat Sheet Machine with Operating Tray for Wax Processing
People Also Ask
- What are the negative consequences of using old or contaminated beeswax in foundations? Protect Your Hive Today
- Why is the regular exchange and replacement of beeswax foundations encouraged? Boost Honey Yield & Hive Biosafety
- What are the primary benefits of using beeswax foundation sheets? Maximize Yields and Efficiency for Commercial Apiaries
- What are beeswax foundation sheets used for? A Guide to Efficient Hive Management
- What are the specific advantages of regular comb replacement? Boost Hive Health with New Beeswax Foundations