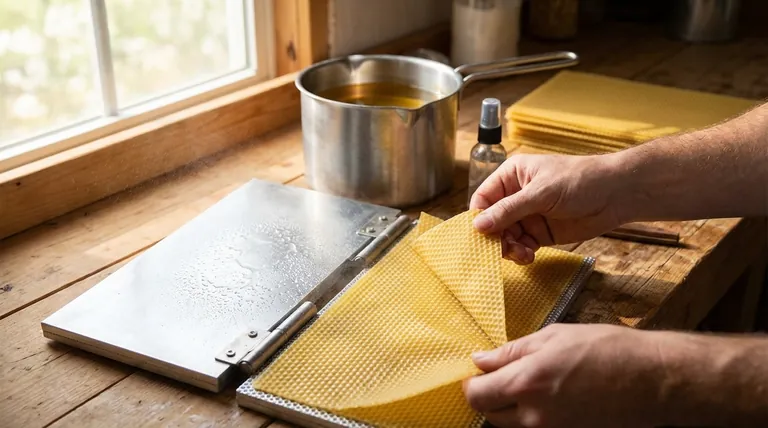
To remove a beeswax sheet from a silicone mold, you must wait until the wax is warm but firm, not hot. Carefully separate the two halves of the mold and then slowly and gently peel the flexible beeswax sheet away from the silicone, starting from one edge and working your way across to prevent tearing.
The key to effortless removal isn't just the final peeling motion; it's a result of proper mold preparation and precise temperature control before you even get to that step. A stuck sheet is a symptom of a problem earlier in the process.
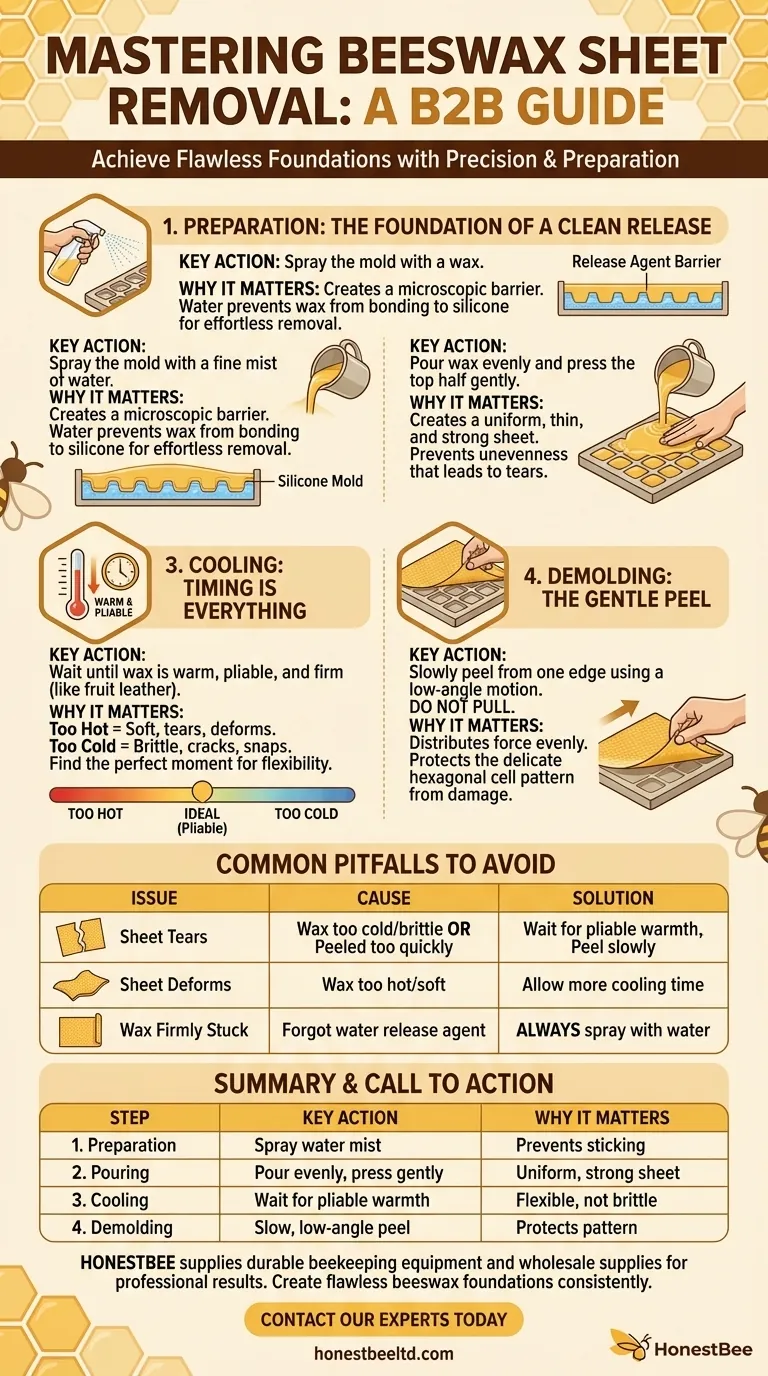
The Foundation: Preparing for a Clean Release
The easiest way to remove your beeswax sheet is to prevent it from sticking in the first place. Proper preparation is a non-negotiable step for consistent results.
The Role of a Release Agent
Before you pour any wax, spray the inside of the silicone mold with water. A fine mist is all you need.
This simple action creates a microscopic barrier between the hot wax and the silicone. The water prevents the beeswax from forming a strong bond with the mold, making it significantly easier to peel off later.
Mastering the Pouring and Pressing Technique
The quality and uniformity of your sheet directly impact how easily it can be handled during removal. An uneven or poorly formed sheet is far more likely to tear.
Achieving an Even Pour
Pour the melted beeswax into the bottom half of the mold in a smooth, continuous motion. Moving from left to right helps ensure the wax spreads evenly across the entire surface.
Setting the Mold Top
Place the top half of the mold onto the molten wax. Gently press down and guide it into place, which helps push the wax into every cell and ensures the final sheet is thin and uniform. If you notice any empty spots, try to carefully push hot wax into that area before it sets.
The Critical Factor: Demolding at the Right Temperature
Temperature is the single most important variable when removing the sheet. This is a delicate balance between the wax being too hot and too cold.
Why Temperature is Everything
If the wax is too hot, the sheet will be soft and fragile. It will stretch, deform, or tear as you try to remove it, destroying the delicate cell pattern.
If the wax is too cold, it becomes brittle. The sheet may crack or snap instead of flexing as you peel it from the mold.
Identifying the "Perfect" Moment
The ideal time to demold is when the sheet is warm and pliable, similar to the consistency of fruit leather. It should feel firm to the touch and have fully solidified, but still retain enough warmth to be flexible.
The Demolding Process: A Step-by-Step Guide
When you have prepared the mold correctly and let the wax cool to the optimal temperature, the final step becomes simple and satisfying.
Separate the Mold Halves
Begin by carefully peeling the top half of the mold off the sheet. This should reveal the perfectly formed beeswax sheet resting in the bottom half.
Peel, Don't Pull
Start at one corner or edge of the beeswax sheet. Slowly peel it away from the silicone. Do not try to pull it straight up. The goal is a low-angle peeling motion, which minimizes stress on the wax.
Continue this slow and steady peeling process across the entire sheet. Patience here prevents the damage that a rushed, forceful pull will inevitably cause.
Common Pitfalls to Avoid
Troubleshooting issues almost always leads back to a breakdown in preparation or timing.
The Sheet Tears During Removal
This is a classic sign that the wax was too cold and brittle, or you peeled it too quickly. The force of a fast pull concentrates on one spot, causing a tear.
The Sheet Deforms or Loses Shape
If the cell pattern stretches or the sheet sags as you remove it, the wax was too hot and soft. You must allow more time for it to cool and firm up.
Wax Is Firmly Stuck to the Mold
This almost always means you forgot to spray the mold with water before pouring. Without that release agent, the beeswax can bond directly to the silicone, making a clean release nearly impossible.
Making the Right Choice for Your Goal
Achieving perfect beeswax sheets is a process of refinement. Focus on mastering the fundamentals, not just the final step.
- If your primary focus is consistency: Always use water as a release agent. This single step eliminates the most common cause of sticking.
- If your primary focus is sheet quality: Be patient during the cooling phase. Demolding at the correct pliable temperature is the secret to a strong, flexible, and undamaged sheet.
- If your primary focus is preventing tears: Peel slowly and deliberately. A gentle, low-angle peel distributes force evenly and protects the delicate structure of the sheet.
Mastering these core principles transforms a frustrating task into a reliable and repeatable process.
Summary Table:
| Step | Key Action | Why It Matters |
|---|---|---|
| 1. Preparation | Spray mold with a fine mist of water. | Creates a release barrier to prevent sticking. |
| 2. Pouring | Pour wax evenly and press mold top gently. | Ensures a uniform, strong sheet that is less likely to tear. |
| 3. Cooling | Wait until wax is warm and pliable, like fruit leather. | Wax is flexible but firm, preventing brittleness or softness. |
| 4. Demolding | Slowly peel the sheet from one edge at a low angle. | Distributes force evenly to protect the delicate cell pattern. |
Create flawless beeswax foundations consistently. Whether you're a commercial apiary or a distributor, the right equipment and supplies are key to efficiency and product quality. HONESTBEE supplies durable, beekeeping equipment and wholesale supplies designed for professional results. Contact our experts today to discuss your needs and elevate your beekeeping operation.
Visual Guide
Related Products
- Beeswax Foundation Sheets Beehive Foundation for Wholesale
- Electric Beeswax Flat Sheet Machine with Operating Tray for Wax Processing
- Manual Beeswax Flat Sheet Machine for Beeswax Processing
- Beeswax Machine Press Embosser Wax Foundation Mold Printer Bee Hive Equipment Making Sheet
- Notebook Style Beeswax Foundation Mould Wax Foundation Mold
People Also Ask
- What are the specific advantages of regular comb replacement? Boost Hive Health with New Beeswax Foundations
- What are the characteristics of the beeswax sheets made for beekeeping? Boost Hive Efficiency with Precision Wax Foundation
- How do beeswax foundation sheets benefit modern hives? Boost Honey Yield and Optimize Colony Efficiency
- What are the negative consequences of using old or contaminated beeswax in foundations? Protect Your Hive Today
- What are the primary benefits of using beeswax foundation sheets? Maximize Yields and Efficiency for Commercial Apiaries