In short, leftover wax comb from a honey harvest is not a waste product but the primary source for rendering valuable, pure beeswax. The process involves rinsing the comb to recover any residual honey, then gently heating and filtering the wax to clean it before letting it cool into a solid block.
After the honey harvest is complete, the work isn't over. The leftover cappings and broken comb are a valuable resource that, with a simple rendering process, can be transformed into clean beeswax for crafts, sales, or use in your apiary.
The Two Resources in Your Leftover Comb
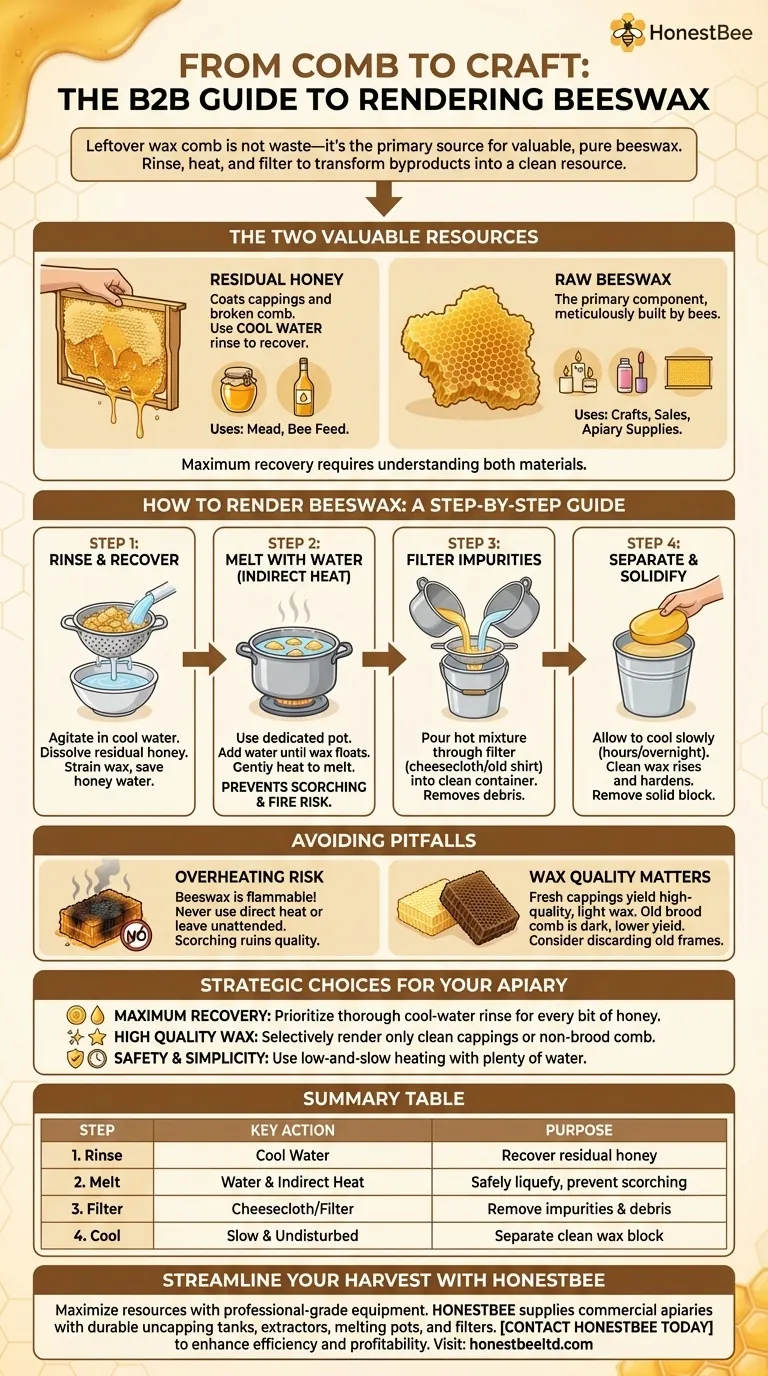
After you extract honey, the remaining wax cappings and broken pieces of comb contain two valuable materials. Understanding both allows for maximum recovery.
Residual Honey
The cappings you slice off frames are coated in honey. Trying to melt the wax without first recovering this honey is a missed opportunity.
You can reclaim this honey by rinsing the cappings in cool water. Using cool water is critical, as warm or hot water will begin to melt the wax, creating a sticky mixture. The resulting honey-water solution can be used to make mead or to feed back to your bees.
Raw Beeswax
The primary component of your leftover comb is, of course, the beeswax itself. This wax was meticulously built by your bees and is a valuable product on its own.
The goal of rendering is to separate this pure wax from impurities like honey, propolis, pollen, and the "slumgum" or debris left behind from old cocoons.
How to Render Beeswax: A Step-by-Step Guide
Rendering is the process of melting, cleaning, and solidifying wax. The most common and safest method for a beekeeper at home uses water and indirect heat.
Step 1: Rinse the Wax
As mentioned, your first step should always be to rinse your cappings and comb in cool water. Agitate them gently to dissolve as much residual honey as possible, then strain the wax and set it aside.
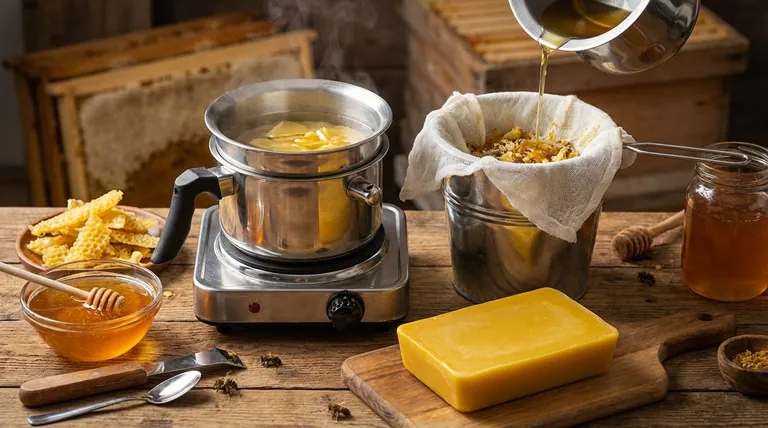
Step 2: Melt with Water
Place the rinsed wax into a dedicated pot that you do not use for food. Do not apply direct heat, as this can easily scorch the wax and poses a significant fire risk.
Instead, add water to the pot until the wax is floating. Gently heat the pot, allowing the wax to melt completely into a liquid layer on top of the water. This acts as a natural double-boiler, preventing scorching.
Step 3: Filter Out Impurities
Once the wax is fully melted, you must strain it to remove debris. Prepare a second container (like a clean bucket) and secure a filter, such as several layers of cheesecloth or a piece of an old t-shirt, over the top.
Carefully pour the hot water and wax mixture through the filter. The water will pass through, and the liquid wax will follow, leaving the solid impurities behind in the cheesecloth.
Step 4: Separate and Solidify
Allow the bucket of hot water and filtered wax to cool slowly and undisturbed for several hours, or overnight. As it cools, the clean wax will rise to the surface and harden into a solid disk. The remaining impurities will settle to the bottom in the water.
Once the wax is completely solid, you can simply lift the block of clean beeswax off the top of the dirty water. The underside of the wax disk may have a thin, soft layer of debris that can be easily scraped off.
Understanding the Pitfalls
Rendering wax is straightforward, but mistakes can compromise the quality of the final product or create safety hazards.
The Risk of Overheating
Beeswax is flammable. Never melt it over direct heat or leave it unattended. Scorched wax becomes discolored, develops a burnt odor, and loses its desirable qualities. Always use water as a buffer or a dedicated double-boiler.
Not All Wax is Equal
The highest quality, lightest-colored beeswax comes from fresh, clean cappings. Old brood comb that has been used for raising bee larvae will be dark and contain many old cocoons. This comb yields significantly less wax and produces a lower-quality, darker product. Many beekeepers choose to simply discard old brood frames rather than render them.
Making the Right Choice for Your Goal
Your approach depends on what you value most from your harvest byproducts.
- If your primary focus is maximum resource recovery: Take the time to do a thorough cool-water rinse to save every bit of honey before you begin melting the wax.
- If your primary focus is high-quality, light-colored beeswax: Be selective and only render clean cappings or comb that has not been used for brood.
- If your primary focus is safety and simplicity: Use a low-and-slow heating method with plenty of water, and never rush the melting or cooling process.
By properly rendering your leftover comb, you complete the harvest cycle and turn a byproduct into another valuable gift from the hive.
Summary Table:
| Step | Key Action | Purpose |
|---|---|---|
| 1 | Rinse with Cool Water | Recover residual honey |
| 2 | Melt Wax with Water (Indirect Heat) | Safely liquefy wax without scorching |
| 3 | Filter Through Cheesecloth | Remove impurities and debris |
| 4 | Cool & Solidify | Separate clean wax into a solid block |
Ready to streamline your honey harvest and wax rendering process?
As a beekeeper, you know the value of maximizing every resource from your hives. HONESTBEE supplies commercial apiaries and beekeeping equipment distributors with the high-quality, durable supplies needed for efficient harvesting and processing.
From uncapping tanks and honey extractors to melting pots and filters, our wholesale-focused operations ensure you get the professional-grade equipment your business depends on.
Contact HONESTBEE today to discuss your apiary's needs and discover how our products can enhance your efficiency and profitability.
Visual Guide
Related Products
- Notebook Style Beeswax Foundation Mould Wax Foundation Mold
- Manual Beeswax Comb Foundation Machine Wax Foundation Mill Embossing Machine
- Fully Automatic Beeswax Embossing Machine Foundation Mill
- Electric Beeswax Flat Sheet Machine with Operating Tray for Wax Processing
People Also Ask
- How do you use the Foundation Mold to create beeswax foundation? Master DIY Beekeeping with Precision
- What are the negative consequences of using old or contaminated beeswax in foundations? Protect Your Hive Today
- How can beeswax value-addition processes be utilized to increase beekeeping revenue? Boost Your Apiary Profitability
- Why is high-purity natural beeswax essential for foundations? Prevent Larval Mortality & Boost Colony Health
- Why are specific wax foundation molds used to downsize brood cells? Master Mechanical Pest Inhibition


