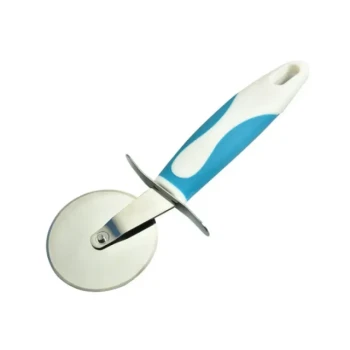
Finished wax foundation sheets are cut to size using a manual template system. After the wax sheet has been embossed by the roller, it is laid flat on a cutting mat. A rigid board or template matching the desired final dimensions is placed directly onto the sheet, and a knife or pizza cutter is used to trim away the excess material.
Precision in sizing wax foundation relies on physical templates rather than complex automation. By using a rigid guide board and a rolling cutter, you ensure every sheet fits perfectly into the hive frames without gaps or buckling.
The Cutting Procedure
Positioning the Sheet
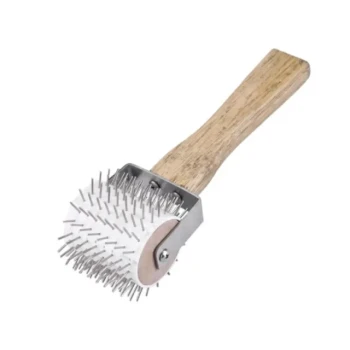
Once the wax has been embossed with the honeycomb pattern, it is moved to a stable work surface. This surface is typically covered with a cutting mat to protect the workspace and the blade. The sheet must be laid completely flat to ensure square corners.
Applying the Template
A physical board, cut to the exact dimensions of the frame being used, serves as the cutting guide. This template is placed directly on top of the embossed wax sheet. It holds the wax in place and prevents the cutting tool from straying.
Trimming the Excess
With the template secured, the operator traces the edges of the board. The primary reference suggests using a simple knife or a pizza cutter for this task. The rolling action of a pizza cutter often provides a cleaner edge on the wax without dragging the material.
Pre-Cutting Quality Control
The Importance of Uniform Thickness
While cutting shapes the sheet, the quality of the finished product depends on uniform thickness before the cut is made. If a sheet is uneven, it may fit the frame dimensions but fail during wire embedding.
Managing Wax Distribution
To ensure the sheet is uniform before it reaches the cutting mat, specific dipping techniques are required. A single dip often results in a sheet that is significantly thicker at the bottom than the top.
The Two-Ply Technique
To correct thickness variations, a "two-ply dip" method is recommended. This involves dipping the board, reversing the ends, and dipping again. This ensures that the taper created by the first dip is counterbalanced by the second.
Temperature Considerations
These techniques are particularly relevant when working with higher wax temperatures, around 180 degrees F. At this heat, wax runs off more quickly, making the double-dip rotation essential for creating a substantial sheet capable of holding wires.
Common Pitfalls to Avoid
Uneven Sheet Density
The most common issue is not the cut itself, but the consistency of the wax being cut. Relying on a single dip results in a wedge-shaped profile. This unevenness can make the final trimmed sheet difficult to install securely in the frame.
Incomplete Coverage
Another pitfall is failing to address the final few inches of the sheet. If a full double-dip isn't performed, a "quick dip" on the opposite end is necessary to even out the bottom 3-4 inches. Neglecting this step leaves weak spots in the foundation.
Ensuring Quality for Your Apiary
To produce foundation that is both the correct size and the correct structural integrity, follow these guidelines:
- If your primary focus is dimensional accuracy: Use a rigid, pre-measured template board and a rolling cutter to prevent the wax from stretching during the trim.
- If your primary focus is sheet durability: Employ the "two-ply dip" technique by reversing the board between dips to ensure even thickness across the entire surface.
- If your primary focus is ease of wiring: Maintain higher wax temperatures (approx. 180°F) and use repeat dipping to create a thicker sheet that embeds wires smoothly.
By combining precise cutting templates with rotation-based dipping techniques, you ensure your foundation is perfectly sized and structurally sound.
Summary Table:
| Aspect | Method / Detail | Benefit |
|---|---|---|
| Cutting Tool | Pizza cutter or sharp knife | Clean edges without dragging the wax |
| Sizing Guide | Rigid template board | Ensures perfect fit for specific frame sizes |
| Thickness Control | Two-ply/Double-dip technique | Uniform density for easier wire embedding |
| Wax Temperature | Approx. 180°F (82°C) | Optimal flow for consistent sheet formation |
| Surface Type | Stable cutting mat | Protects tools and ensures square corners |
Elevate Your Beekeeping Operation with HONESTBEE
At HONESTBEE, we understand that precision in foundation production is vital for the success of commercial apiaries and distributors. Whether you need specialized hive-making machinery, high-efficiency honey-filling machines, or a steady supply of premium beekeeping tools and consumables, we offer a comprehensive wholesale portfolio designed to scale your business.
From industrial-grade equipment to honey-themed cultural merchandise, we provide the hardware and expertise to streamline your production. Contact us today to discover how our tailored solutions can optimize your workflow and increase your output!
Related Products
- Manual Beeswax Comb Foundation Machine Wax Foundation Mill Embossing Machine
- Beeswax Machine Press Embosser Wax Foundation Mold Printer Bee Hive Equipment Making Sheet
- Electric Beeswax Foundation Machine With Operating Tray and Wax Foundation Roller
- Fully Automatic Beeswax Embossing Machine Foundation Mill
- Electric Flatting and Embossing Machine with Tray for Beekeeping
People Also Ask
- How do beeswax foundation machines facilitate the internal recycling of beeswax? Build a Self-Sustaining Apiary
- Why is the introduction of a beeswax foundation machine considered an important step in improving honey yields?
- What are the castings of the beeswax foundation machine made of? Precision Engineering for Efficient Beekeeping
- What is the function of a beeswax foundation machine? Boost Hive Efficiency and Honey Production
- What are the advantages of implementing a pulley and belt drive system in beeswax foundation machinery? Master Quality.