To release a queen bee effectively, begin by carefully removing the cork from one end of her cage. Do this gently to ensure you do not disturb the mesh screen or agitate the bee. Once the cork is removed, allow the colony approximately one hour to acclimate to her pheromones before proceeding with the full physical release.
The Core Objective: Pheromone Acceptance Introducing a queen is not merely about physical placement; it is about biological integration. The cage serves as a protective barrier that allows the colony to adjust to the new queen’s unique scent signature without the immediate risk of aggressive rejection.
The Step-by-Step Release Procedure
1. Preparation and Marking
Before the release begins, ensure the queen is ready for the hive environment. If you have chosen to mark the queen with paint for identification, you must keep her confined for several minutes—preferably in the shade—until the paint dries completely.
This delay is critical. If the paint is wet, attendant bees may attempt to clean it off, removing the mark.
2. Initiating the Release
Carefully remove the cork from one end of the cage. It is vital to maintain a steady hand to avoid damaging the mesh screen, which separates the queen from the colony.
At this stage, do not dump the queen into the hive immediately.
3. The Acclimation Period
Once the cork is removed, observe the colony. You will see worker bees begin to move toward the open end of the cage as they detect the new queen.
According to standard guidance, you should allow the bees about an hour in this state. This brief period of exposure helps the workers become accustomed to her presence and pheromones while she remains partially protected.
4. Final Introduction
After the acclimation period, you can proceed with the full release. Gently release the queen directly onto a brood frame.
When returning the frame to the broodnest, exercise extreme caution. You must place the frame slowly to ensure you do not "roll," crush, or injure the queen against the adjacent frames.
Understanding the Role of the Cage
Why Isolation is Necessary
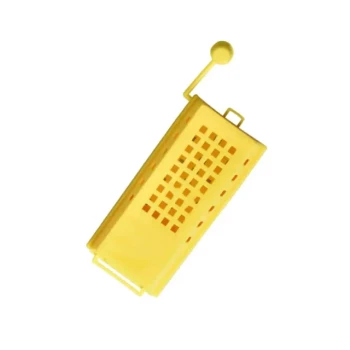
The queen cage—whether a Scalvini, JZ BZ, or wooden double-holed design—is a tool for controlled introduction. It isolates the queen to protect her from potential attacks by worker bees who have not yet accepted her genetic and chemical signature.
The Mechanism of Acceptance
The cage facilitates a gradual introduction. By restricting the queen's movement while allowing airflow, the cage enables the colony to integrate her pheromones into the hive's collective scent. This significantly increases the likelihood of the colony accepting her as their new reproductive leader.
Common Pitfalls to Avoid
Rushing the Paint Drying Process
Releasing a marked queen too quickly can lead to the paint being cleaned off by attendants. Always prioritize the drying time to ensure the mark remains permanent.
Rough Handling of Frames
The most dangerous moment for a new queen is often the physical insertion of the frame. Rolling the queen between combs is a common error that can result in her death or injury, instantly failing the requeening process.
Making the Right Choice for Your Goal
- If your primary focus is safety: Prioritize a longer observation period during the acclimation phase to ensure workers are not showing aggression toward the mesh.
- If your primary focus is identification: Ensure the queen is kept in the shade while the paint dries to prevent the mark from fading or being removed.
- If your primary focus is colony acceptance: Rely on the cage to maintain separation until the workers' movement toward the queen appears calm and inquisitive rather than aggressive.
Success lies in patience; allow the pheromones to do the work before the queen ever touches the comb.
Summary Table:
| Step | Action Item | Critical Success Factor |
|---|---|---|
| 1. Marking | Apply paint and wait | Must be fully dry in the shade to prevent worker removal. |
| 2. Initial Access | Remove cage cork | Avoid damaging the mesh screen or agitating the queen. |
| 3. Acclimation | Wait for 1 hour | Allows worker bees to adjust to the new queen's pheromones. |
| 4. Final Release | Place on brood frame | Exercise extreme caution to avoid crushing or 'rolling' the queen. |
Elevate Your Beekeeping Success with HONESTBEE
At HONESTBEE, we understand that successful queen introduction is the heartbeat of a productive hive. As a dedicated partner to commercial apiaries and global distributors, we provide more than just tools—we provide precision-engineered solutions for the modern beekeeper.
From high-quality queen cages and marking equipment to advanced honey-filling machinery and hive-making tools, our comprehensive wholesale catalog covers every facet of your operation. Whether you are scaling up your production or stocking the latest industry consumables and honey-themed merchandise, our products are designed to enhance efficiency and colony health.
Ready to optimize your apiary operations? Contact us today to explore our wholesale offerings
Related Products
- Durable Galvanized Steel Spring Queen Bee Cage
- Portable Queen Bee Incubator with 12V Car Adapter for Safe Transport
- Professional Queen Bee Introduction and Transport Cage
- Heavy Duty Stainless Steel Queen Bee Catcher Clip
- Queen Bee Catcher Plastic Bee Marker Bottle with Piston Marking Tube
People Also Ask
- What is the technical purpose of the dedicated feeding compartment and access channel in a queen bee cage? Pro Guide
- How long does it typically take for bees to adjust to a new queen? Master the 2-7 Day Requeening Window
- What is the optimal placement for a queen bee cage? Essential Strategies for Successful Re-queening
- What are the advantages and disadvantages of introducing a queen bee by embedding the cage? Boost Your Queen Acceptance
- What materials are required to install a queen bee's cage into a hive? Essential Tools for Successful Queen Integration