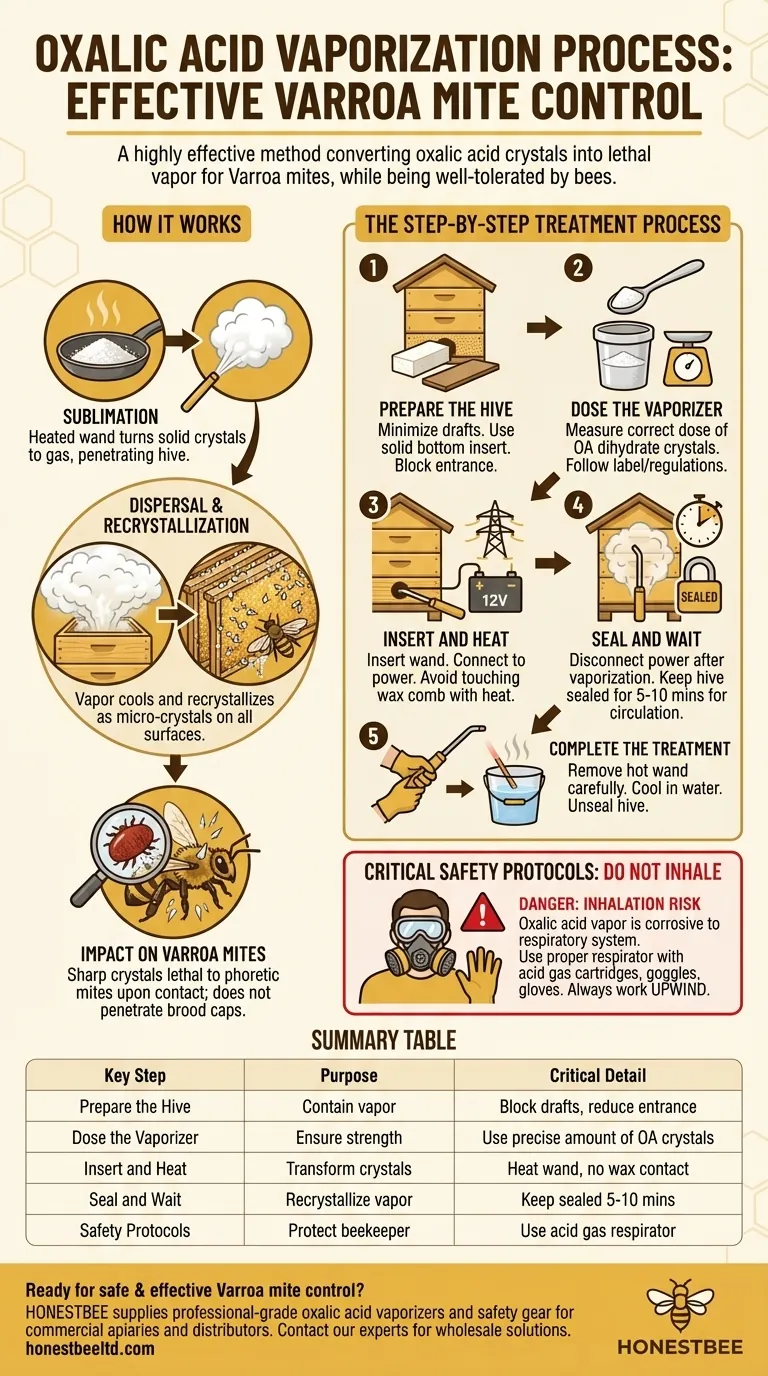
Using an oxalic acid vaporizer is a process where oxalic acid crystals are heated on a specialized wand, turning them directly into a vapor that fills the beehive. This vapor then recrystallizes on all internal surfaces, including the bees themselves. These micro-crystals are lethal to Varroa mites upon contact but are well-tolerated by the bees when applied correctly.
The core challenge for beekeepers is effective and safe Varroa mite management. Oxalic acid vaporization is a highly effective method that treats the entire hive environment, but its success and your safety depend entirely on a precise process and the mandatory use of proper protective equipment.
How Oxalic Acid Vaporization Works
The effectiveness of this method lies in a simple chemical process and its interaction with the hive environment. Understanding the "why" ensures you perform the "how" correctly.
The Principle of Sublimation
The heated vaporizer wand doesn't melt the oxalic acid crystals; it causes them to sublimate. This means they transition directly from a solid to a gas state.
This vapor is the key to distribution, as it can penetrate the entire hive cavity, reaching areas that liquid treatments cannot.
Dispersal and Recrystallization
Once the hive is filled with hot oxalic acid vapor, the process reverses as it cools. The vapor recrystallizes into microscopic, sharp crystals on every surface.
This includes the hive walls, the frames, and, most importantly, the bodies of the bees and the Varroa mites riding on them.
The Impact on Varroa Mites
The sharp micro-crystals are the killing agent. When a Varroa mite comes into contact with them, the crystals damage the mite's delicate structures, leading to its death.
This method is primarily effective against phoretic mites—those physically attached to adult bees. It does not penetrate the wax cappings of brood cells and therefore will not kill mites reproducing within them.
The Step-by-Step Treatment Process
Following a consistent and precise workflow is critical for both effectiveness and personal safety. Always defer to the specific instructions provided with your equipment.
Step 1: Prepare the Hive
Before treatment, you must minimize drafts to ensure the vapor is contained.
If you use a screened bottom board, slide in your IPM grid board or another solid insert. Temporarily block or reduce the main entrance with foam or a cloth.
Step 2: Dose the Vaporizer
Measure the correct dose of oxalic acid dihydrate crystals as specified by the product label and your local regulations. An incorrect dose can be ineffective or harmful to the bees.
Place the measured crystals into the cup or pan of the vaporizer wand.
Step 3: Insert and Heat
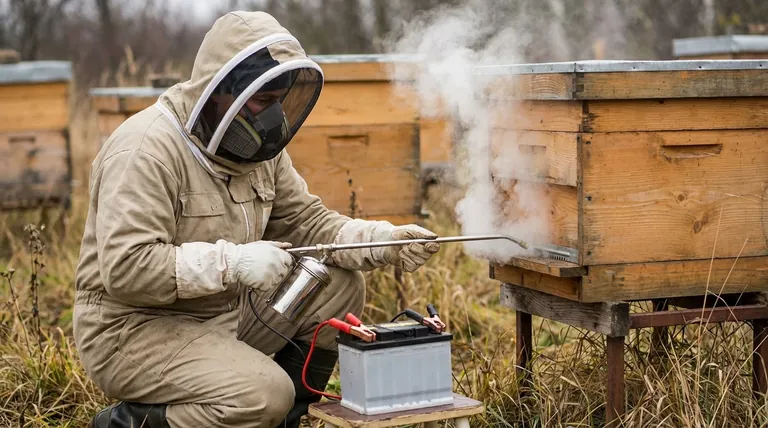
Insert the vaporizer wand through the hive entrance, ensuring the heated portion does not directly touch wax comb.
Connect the vaporizer to its power source (typically a 12V battery). The wand will begin to heat, and you will see the vapor start to form and fill the hive.
Step 4: Seal and Wait
Once all the acid has vaporized (usually 2-3 minutes), disconnect the power but leave the wand in place to help seal the entrance.
Keep the hive sealed for an additional 5-10 minutes. This allows the vapor to fully circulate and settle as crystals throughout the colony.
Step 5: Complete the Treatment
After the waiting period, carefully remove the vaporizer wand. Be aware that it is extremely hot.
Many beekeepers will immediately and carefully dip the hot end of the wand into a bucket of water to cool it quickly, preventing burns and making it safe to handle. You can then unseal the hive entrance.
Understanding the Critical Safety Protocols
This is not a process to be taken lightly. Oxalic acid vapor is corrosive and highly damaging to the human respiratory system. Your safety is paramount.
The Primary Danger: Inhalation
The micro-crystals that kill mites can cause severe and permanent damage to your lungs if inhaled. This is the single most important risk to mitigate.
Essential Personal Protective Equipment (PPE)
You must use a properly rated respirator with acid gas cartridges. A simple N95 dust mask is insufficient and will not protect you from the vapor.
Full-seal goggles, long sleeves, and chemical-resistant gloves are also essential to protect your eyes and skin from exposure.
Mind Your Position
Always work upwind of the hive being treated. This ensures that any vapor that might escape from a poor seal is blown away from you, not towards you.
Making the Right Choice for Your Goal
- If your primary focus is treating during a broodless period: Vaporization is an exceptionally effective choice for knocking down the phoretic mite population in late fall or winter.
- If your primary focus is efficiency across many hives: Once you establish a safe workflow, vaporization can be one of the quickest treatment methods per colony.
- If your primary focus is avoiding harsh chemicals: Oxalic acid is an organic acid already present in honey, and when used properly, it does not contaminate the wax or honey.
Properly executed, oxalic acid vaporization is a powerful and reliable tool for maintaining a healthy, varroa-free colony.
Summary Table:
| Key Step | Purpose | Critical Detail |
|---|---|---|
| Prepare the Hive | Contain vapor for maximum effectiveness | Block drafts and reduce entrance size |
| Dose the Vaporizer | Ensure correct treatment strength | Use precise amount of OA dihydrate crystals |
| Insert and Heat | Transform crystals into vapor | Heat wand without touching wax comb |
| Seal and Wait | Allow vapor to circulate and recrystallize | Keep hive sealed for 5-10 minutes |
| Safety Protocols | Protect beekeeper from harmful vapor | Use respirator with acid gas cartridges |
Ready to implement safe and effective Varroa mite control? HONESTBEE supplies commercial apiaries and beekeeping equipment distributors with professional-grade oxalic acid vaporizers and all necessary safety gear. Our wholesale-focused operations ensure you get reliable equipment for protecting your investment. Contact our expert team today to discuss your apiary's needs and discover the HONESTBEE advantage.
Visual Guide
Related Products
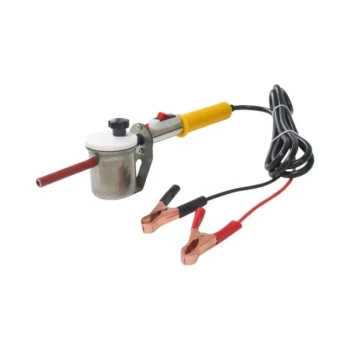
- Heavy Duty 12V Oxalic Acid Evaporator Vaporizer for Bee Varroa Mite Treatment Beekeeping Fumigator Atomizer
- Durable 12V Oxalic Acid Vaporizer for Varroa Mite Treatment Beehive Beekeeping Tool
- Oxalic Acid Vaporizer 12V for Bee Varroa Mite Treatment
- 12V Bee Mite Removal Evaporator Oxalic Acid Vaporizer for Bee Fumigation Treatment 180W Atomization
- Adjustable Formic and Acetic Acid Dispenser for Bee Mite Treatment
People Also Ask
- What is the vaporization method of using oxalic acid? A Gentle, Effective Varroa Mite Treatment
- How can oxalic acid vaporization be used effectively in a hive that contains brood? Master Multi-Stage Mite Control
- Which specific stage of the varroa mite life cycle is vulnerable to oxalic acid vaporization? Target Phoretic Mites
- What is the primary function of specialized applicators like oxalic acid vaporizers? Efficient Pest Management Guide.
- What is the significance of timing oxalic acid vaporization treatments during broodless periods? Maximize Mite Control