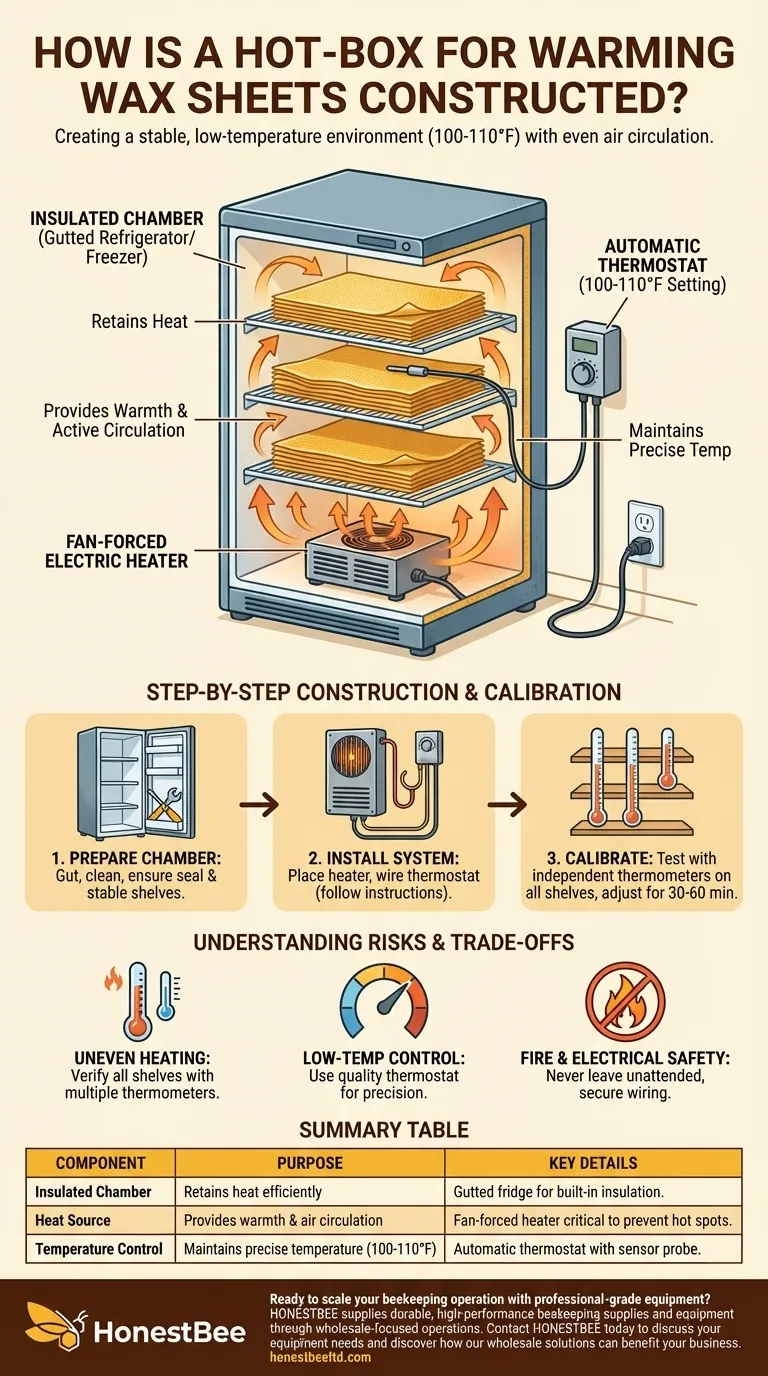
To construct a hot-box for warming wax sheets, you need three primary components: an insulated chamber, a heat source, and a temperature control system. A common method involves repurposing an old, gutted refrigerator for the chamber, placing a fan-forced electric space heater inside as the heat source, and wiring it to an automatic thermostat to maintain the required temperature.
The core challenge is not just generating heat, but creating a stable, low-temperature environment (100-110°F) with even air circulation. Success depends on combining an insulated box with a thermostatically-controlled, fan-forced heater to prevent hot spots that can melt your wax.

The Core Components of a Wax Hot-Box
To build a reliable unit, you must understand the function of each part. The goal is to create a low-temperature warming oven, and each component plays a critical role in achieving stable, uniform heat.
The Insulated Chamber
The primary purpose of the chamber is to retain heat efficiently. An old, non-working refrigerator or freezer is an ideal choice because it is heavily insulated, comes with built-in shelving, and has a tight-sealing door.
Before use, the refrigerator must be completely "gutted" of all cooling components like the compressor and refrigerant lines, leaving only the insulated box and the shelves.
The Heat Source
A fan-forced electric space heater is the required heat source. The heater provides the warmth, but the integrated fan is the most critical element.
The fan actively circulates air throughout the chamber, preventing the formation of hot spots near the heater and cold spots in the far corners. This ensures every wax sheet on every shelf warms at the same rate. A heater without a fan will result in melted sheets on the bottom and brittle sheets on top.
The Temperature Control System
An automatic thermostat is the brain of the operation. It is wired to the heater and automatically switches the power on and off to maintain a specific temperature.
For warming wax, you need a thermostat that can be reliably set in the 100-110°F (38-43°C) range. The thermostat's sensor probe should be placed strategically within the chamber, typically near the middle shelf, to get an average temperature reading.
Step-by-Step Construction and Calibration
Assembling the hot-box is straightforward, but careful calibration is essential for getting predictable results.
Step 1: Prepare the Chamber
After gutting the old refrigerator, ensure the interior is clean. Confirm that the shelves are stable and can support the weight of your wax sheets. The door seal should be intact to prevent heat from escaping.
Step 2: Install the Heater and Thermostat
Place the fan-forced heater on the bottom of the chamber, ensuring it has clear space around it for air intake and output.
Run the electrical cords for the heater and thermostat out of the chamber. You may need to drill a small, sealable hole for this. The heater should be plugged into the thermostat's controller, which is then plugged into the wall. Always follow the manufacturer's instructions for wiring the thermostat.
Step 3: Calibrate Your System
Place the thermostat's sensor on the middle shelf. To properly calibrate, place an independent thermometer on each shelf (top, middle, and bottom).
Set your thermostat to your target temperature (e.g., 105°F). Let the box run for at least 30-60 minutes and then check the readings on all three thermometers. If the top is too hot or the bottom too cold, you may need to adjust the thermostat setting slightly until all shelves stabilize within the desired 100-110°F range.
Understanding the Trade-offs and Risks
A DIY hot-box is effective, but you must be aware of its limitations and potential dangers.
Risk of Uneven Heating
Even with a fan, minor temperature variations between shelves can occur. This is why using multiple thermometers for initial calibration is not optional—it is the only way to confirm your entire chamber is operating correctly.
The Challenge of Low-Temperature Control
Many residential heaters and thermostats are not designed for precision at low temperatures. A cheap thermostat may have a wide temperature swing, causing the heater to overshoot the target and then let the box get too cool. Invest in a quality thermostat rated for the temperature range you need.
Critical Fire and Electrical Safety
You are placing an electric heating element inside an enclosed, insulated box. This carries an inherent fire risk.
Never leave the unit running unattended for extended periods. Ensure all wiring is secure and protected from damage. Do not place any flammable materials inside or near the hot-box.
Making the Right Choice for Your Goal
With your hot-box built and calibrated, you can warm wax sheets with confidence. Keep your primary objective in mind to ensure the best results.
- If your primary focus is consistency: Rely on a fan-forced heater and use multiple thermometers during calibration to guarantee every sheet is perfectly pliable.
- If your primary focus is safety: Do not compromise on the quality of your electrical components and never leave the hot-box operating unattended.
- If your primary focus is efficiency: A well-sealed, fully insulated chamber will hold heat better, reducing the amount of time the heater needs to run.
By taking a methodical approach, you can build a reliable and effective tool for your beekeeping or candlemaking work.
Summary Table:
| Component | Purpose | Key Details |
|---|---|---|
| Insulated Chamber | Retains heat efficiently | Use a gutted refrigerator/freezer for built-in insulation and shelving. |
| Heat Source | Provides warmth and air circulation | A fan-forced electric heater is critical to prevent hot spots. |
| Temperature Control | Maintains precise temperature (100-110°F) | An automatic thermostat with a sensor probe ensures stable heat. |
Ready to scale your beekeeping operation with professional-grade equipment?
Building a DIY hot-box is a great project, but for commercial apiaries and distributors, reliability and efficiency are paramount. HONESTBEE supplies durable, high-performance beekeeping supplies and equipment through wholesale-focused operations. We help you maintain consistent productivity and protect your valuable investments.
Contact HONESTBEE today to discuss your equipment needs and discover how our wholesale solutions can benefit your business.
Visual Guide
Related Products
- Electric Beeswax Flat Sheet Machine with Operating Tray for Wax Processing
- Beeswax Foundation Sheets Beehive Foundation for Wholesale
- Manual Beeswax Flat Sheet Machine for Beeswax Processing
- Beeswax Machine Press Embosser Wax Foundation Mold Printer Bee Hive Equipment Making Sheet
- Fully Automatic Beeswax Embossing Machine Foundation Mill
People Also Ask
- How do cultural merchandise processing machines contribute to the economic value chain? Boosting Apiary Profitability
- What is the primary function of the double-roller extrusion system? Master Precision Beeswax Foundation Production
- How does the machine flatten the beeswax? A Guide to Roller and Press Methods
- What are the key functions of a beeswax machine? Maximize Apiary Efficiency & Revenue with Professional Equipment
- What is the economic and operational value of beeswax processing? Maximize Profits and Hive Health with Refining


