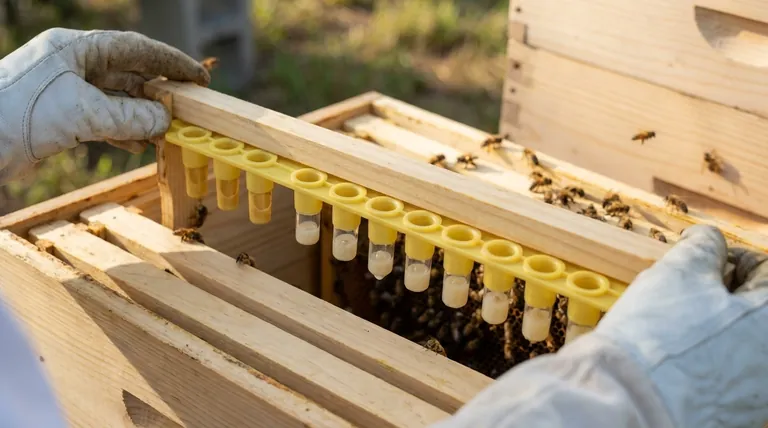
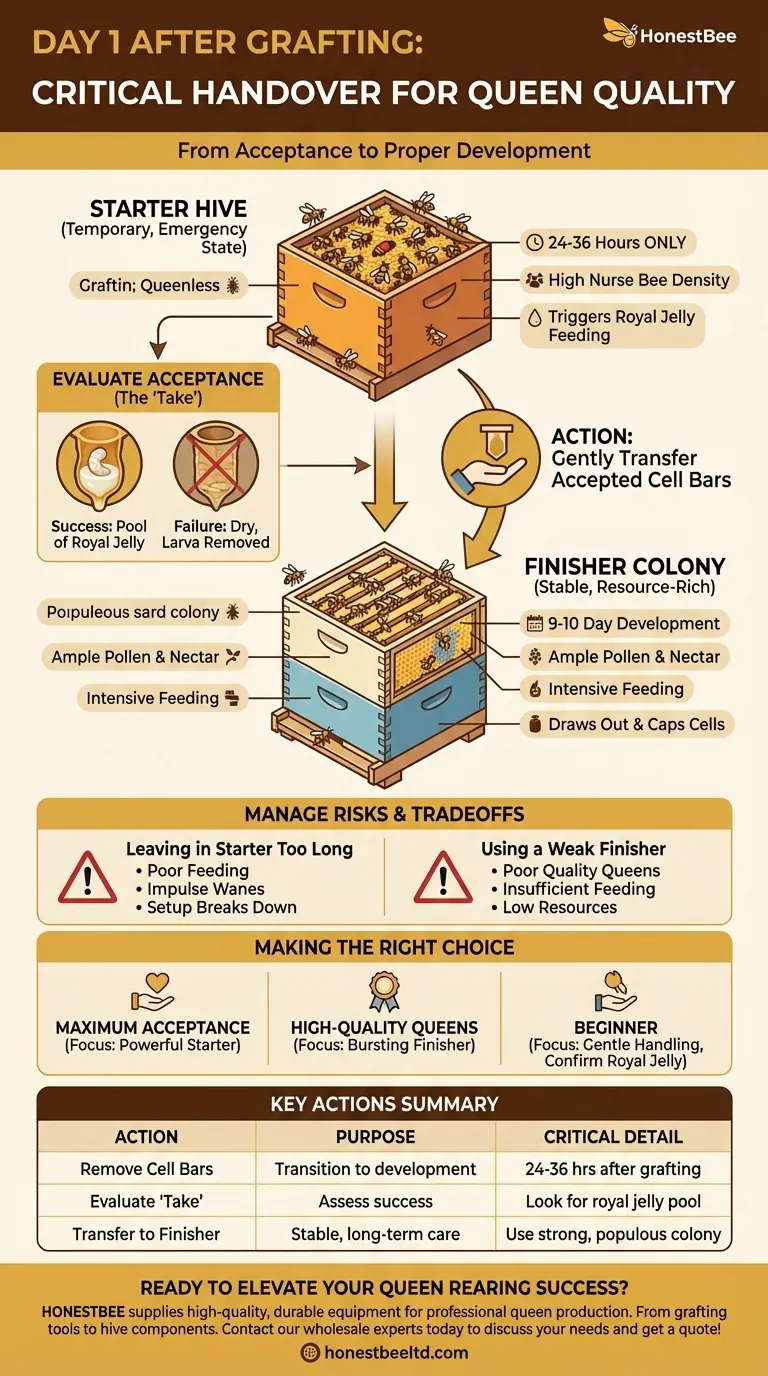
On the morning of day 1 after grafting, your single most important task is to remove the bars of grafted queen cells from the starter hive. This action marks the critical transition from getting the cells accepted to getting them finished properly. The initial acceptance, or "take," will vary based on your skill and the condition of the bees.
Your core objective is to move the newly accepted cells from the intense, temporary environment of a queenless starter colony into a stable, resource-rich finisher colony that will nourish them for the next nine to ten days.
The Purpose of the Starter Hive
A starter hive is a specialized, short-term environment. Its sole function is to create an emergency situation that compels nurse bees to immediately accept grafted larvae and begin feeding them royal jelly.
A State of Emergency
The typical starter hive is made queenless and packed with a high density of young nurse bees. This queenless state triggers the bees' emergency impulse to create a new queen. By providing them with grafted larvae of the perfect age, you are simply directing this powerful instinct.
Why Only 24 Hours?
The starter hive's job is done once the cells are accepted and the larvae are "primed" with a bed of royal jelly. This environment is artificially stressful and not ideal for the long-term, high-quality development of a queen. The goal is to get in, get the cells started, and get out.
Evaluating Acceptance (The "Take")
Before moving the cell bars, you must quickly assess your success rate. This evaluation informs you about the quality of your grafting process and the condition of your starter hive.
What Acceptance Looks Like
A successfully accepted cell will have a visible pool of milky-white royal jelly at its base. The tiny larva will be floating on top of this pool. Rejected cells will appear dry, or the bees will have removed the larva entirely.
Factors Influencing Your Success
The "take" rate is a direct reflection of several factors. The most critical are the age of the grafted larvae (ideally 12-24 hours old), the gentle handling of the larvae during transfer, and the strength and population density of your starter hive.
Transferring to the Finisher Colony
The finisher colony is where your accepted cells will spend the majority of their development. Unlike the starter, this hive is built for stable, long-term care.
The Role of the Finisher
A finisher is a strong, healthy, and populous colony with ample pollen and nectar. Its job is to continuously feed the developing queen larvae, draw out the wax cells, and eventually cap them. This colony can be queenright (with the queen separated by an excluder) or queenless, depending on your specific method.
The Transfer Process
The physical move is simple but requires care. Gently remove the bars of accepted cells from the starter hive's frame. Avoid jarring or shaking them, as this can dislodge the larvae from their bed of royal jelly. Promptly place the bar into a prepared frame within your finisher colony.
Understanding the Trade-offs and Risks
While this process is straightforward, mistakes at this handover stage can compromise your entire effort.
Leaving Cells in the Starter Too Long
If cells remain in the temporary starter hive for more than 24-36 hours, you risk having them poorly fed. The queenless bees' initial emergency impulse can wane, and the artificial colony setup can begin to break down.
Using a Weak Finisher Colony
Placing your accepted cells in a weak finisher is the most common cause of poor-quality queens. A colony without a surplus of nurse bees and food resources cannot provide the intensive feeding required to develop large, well-mated queens.
Making the Right Choice for Your Goal
The actions you take on day one set the stage for the final quality of your queens. Focus your preparation based on your primary objective.
- If your primary focus is maximum acceptance: Prepare a powerful, crowded, and well-fed starter hive at least 24 hours before you intend to graft.
- If your primary focus is high-quality queens: Ensure your finisher colony is bursting with nurse bees and has abundant stores of pollen and nectar to properly nourish the cells.
- If you are a beginner: Concentrate on gentle handling and confirming a visible ring of royal jelly in the cells before you transfer them; don't be discouraged by a low initial take.
This carefully timed transfer is the essential handover that ensures your future queens get the best possible start in life.
Summary Table:
| Key Action | Purpose | Critical Detail |
|---|---|---|
| Remove Cell Bars | Transition from acceptance to proper development. | Must be done 24-36 hours after grafting. |
| Evaluate 'Take' | Assess grafting success and hive condition. | Look for a pool of milky-white royal jelly in the cell. |
| Transfer to Finisher | Provide stable, resource-rich environment for 9-10 days of growth. | Use a strong, populous colony with ample food. |
Ready to elevate your queen rearing success? The right equipment is crucial for building strong starter and finisher hives. HONESTBEE supplies commercial apiaries and beekeeping equipment distributors with the high-quality, durable supplies needed for professional queen production. From grafting tools to hive components, we support your operation's growth. Contact our wholesale experts today to discuss your needs and get a quote!
Visual Guide
Related Products
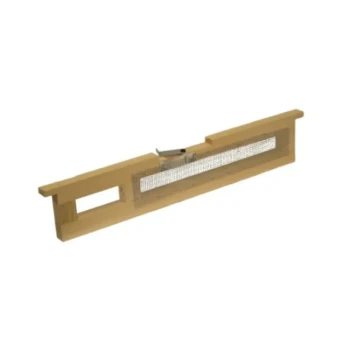
- Portable Bee Mating Hive Boxes Mini Mating Nucs 8 Frames for Queen Rearing
- Professional Multi-Functional Queen Bee Cage
- Jenter Queen Rearing Kit Complete Set for Bee Breeding
- Premium Nicot Style Queen Rearing Kit with Hair Roller Bee Cages
- Automatic Heat Preservation 6 Frame Pro Nuc Box for Honey Bee Queen Mating
People Also Ask
- What are the technical benefits of mini nucleus mating hives? Optimize Queen Rearing Efficiency and Success
- What are the advantages of Portable Mating Nucs for island breeding? Maximize Efficiency with Specialized Gear
- What are the design advantages of professional mating nucleus boxes? Boost Queen Survival and Breeding Efficiency
- What is an 8 frame box and why is it popular? A Lighter, More Ergonomic Hive Solution
- What role does the structural configuration of beekeeping mating boxes play? Optimize Queen Mating Success