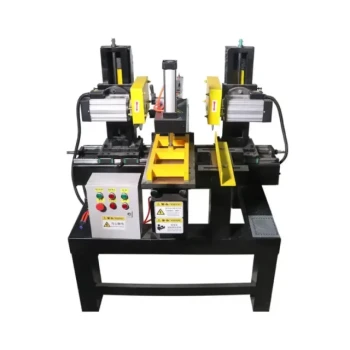
The manufacturing workflow utilizes a tandem saw configuration. The process begins at a lead table saw where the operator squares one edge of the board, simultaneously removing natural defects like knots or wane. Immediately following this preparation, the board passes through a second ripsaw located directly behind the first, which is preset to the specific dimension required to cut the super to its final, consistent width.
By decoupling the edge preparation from the final sizing, this method ensures that every unit is structurally sound and dimensionally identical without requiring repeated machine adjustments.
Establishing the Reference Edge
The Function of the Lead Saw
The process starts with a pallet of raw lumber positioned at the lead table saw. The primary goal here is not yet to determine the final width, but to establish a geometric baseline. The operator cuts one edge to be perfectly square and straight.
Removing Structural Defects
This first step also serves as the critical quality control phase. As the operator squares the edge, they simultaneously trim away knots and wane (the rounded, bark-covered edge of the lumber). This ensures that the reference edge is solid wood, free of imperfections that could compromise the final joint.
Achieving Dimensional Consistency
The Secondary Ripsaw Setup
A second ripsaw is positioned directly behind the lead saw to create a continuous production line. Once the board leaves the first station, it is immediately ready for the final sizing pass.
Locking in the Final Width
Unlike the first saw, which varies based on the raw board's condition, the second saw is fixed. It is preset to a specific dimension. Because the board now has a flat, square reference edge from the first step, this machine simply rips the super to its exact, final width.
Understanding the Trade-offs
Equipment Investment vs. Speed
This two-step process requires two separate machines and a larger physical footprint than a single-saw operation. However, it eliminates the downtime associated with constantly adjusting a fence between squaring and sizing cuts.
Material Waste
Aggressively removing wane and knots in the first step creates a higher volume of offcuts. While this reduces the total yield per board, it significantly reduces the rejection rate of finished components further down the line.
Optimizing Your Production Workflow
To replicate this efficiency in your own shop or project planning, focus on separating distinct operations.
- If your primary focus is component precision: Isolate the squaring process to ensure your reference edge is perfect before attempting to cut to size.
- If your primary focus is throughput: Utilize a dedicated, preset station for your final dimension to eliminate the variability and time cost of manual measuring.
By treating edge truing and final sizing as separate distinct stages, you transform variable raw lumber into standardized, high-quality components.
Summary Table:
| Process Stage | Machine Station | Primary Objective | Key Outcome |
|---|---|---|---|
| Step 1: Squaring | Lead Table Saw | Establish a geometric baseline & remove defects | Straight reference edge; no knots or wane |
| Step 2: Sizing | Secondary Ripsaw | Cut to fixed final dimensions | Uniform, dimensionally identical components |
| Efficiency Focus | Continuous Line | Eliminate manual fence adjustments | High throughput with minimal downtime |
Elevate Your Beekeeping Operation with HONESTBEE
Precision manufacturing is the backbone of a successful apiary. At HONESTBEE, we specialize in empowering commercial apiaries and distributors with the high-performance tools and machinery needed to scale production.
Whether you are looking for advanced hive-making machinery, precision honey-filling systems, or high-quality beekeeping consumables, our comprehensive wholesale portfolio is designed to enhance your efficiency and product quality. From specialized hardware to honey-themed cultural merchandise, we provide the full spectrum of industry essentials.
Ready to optimize your workflow? Contact us today to discover how our professional-grade equipment and machinery can drive your business growth.
Related Products
People Also Ask
- In what way does high-performance beehive manufacturing machinery affect apiary efficiency? Maximize Your ROI
- How does beehive manufacturing machinery benefit large-scale commercial beekeeping? Scale Your Apiary Efficiency
- What is the significance of specialized beehive manufacturing machinery? Drive Scalability for Commercial Apiaries
- What is the industrial value of specialized beehive manufacturing machinery? Scaling Professional Meliponiculture
- In what ways does specialized beehive manufacturing machinery affect smart monitoring? Precision for Reliability